Setting up Cloudflare Workers for web performance optimisation and testing
I recently published a blog post about Cloudflare Worker recipes. It occurred to me after publishing that I'd offered no guidance at all to the reader as to how to get started using them. You need to do that before you can start using the recipes I'd listed. So I aim to rectify that in this follow up blog post where I go through the process step by step, including images.
The aim of this blog post is to get you all setup with a Worker, then write some code to allow us to rewrite the CSS rules on the BBC News homepage so that all the fonts render using 'Comic Sans'. A very silly objective but one that should teach you the basics.
The famous quote from Ian Malcome (Jeff Goldblum) in Jurassic Park feels very relevant right now:
Your scientists were so preoccupied with whether they could, they didn't stop to think if they should.
So let us proceed... If you already have a Cloudflare account you can skip step 1.
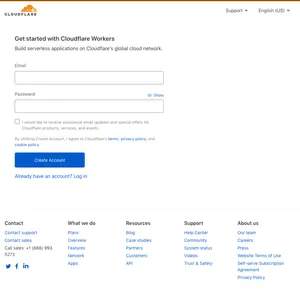
Step 1 - Sign up
This is dead simple, visit this URL and create yourself an account.
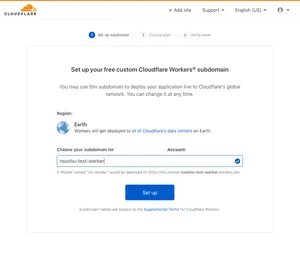
Step 1a - Choose a subdomain
Your worker will require a unique subdomain. You will then create your own workers under this unique subdomain. For example in the instance below a Worker named "my-worker" would be deployed to: https://my-worker.nooshu-test-worker.workers.dev:
Step 1b - Choose a plan
Next up is time to choose your plan. As you are just starting out you could use the free plan for testing. But for only $5 per month you get a whole bunch of benefits. This post isn't sponsored by Cloudflare, I promise!

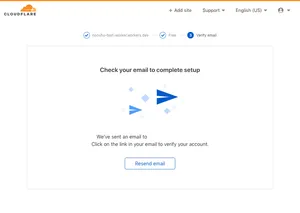
Step 1c - Verify your email
Final part of signing up, check your email to verify your new account!
I then had to complete a Google reCAPTCHA after clicking the email link to identify all the boats in the image before being redirected to the login page for the final step in verification:

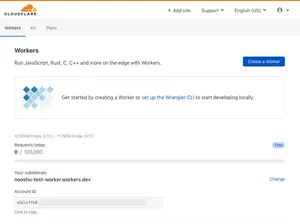
Step 2 - Create your Worker
After login you will be presented with the screen below. Here we are given 2 routes. Either we create a new Worker using by clicking the big blue 'Create a Worker' button to the right of the page, or we can use the wrangler CLI tool used to wrangle your workers. I'll show both routes below. Note: you only need to use one route, so choose your preferred method.
Step 2a - Using the user interface (UI)
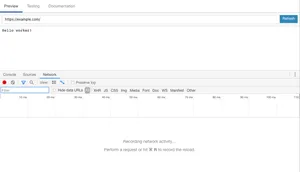
This is the quickest method: setup a new Worker is via the UI as it does it all for you. Once clicking on the 'Create a Worker' you will be presented with this screen. I've annotated it to highlight key areas:
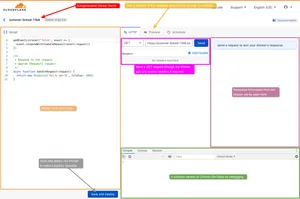
The screen seen above gives you everything you need to develop your first Worker. The name of the worker has been automatically generated by the system, but it can be renamed as needed. The Worker script goes in the left panel. It comes pre-populated with a JavaScript hello world application. You can send a request through the Worker and preview the response in the right panel. A preview of the actual webpage can be seen in the 'Preview' tab. At the bottom right of the page you may notice a section that looks very familiar. It's a cut-down version of the Chrome DevTools panel. It allows you to view console messages, network requests through the worker and also a sources panel for any local sources (worker.js is seen by default). Saving and deploying the above hello world app makes it viewable at https://summer-bread-11b8.nooshu-test-worker.workers.dev (this link isn't live).
The above method works well, but it's a little restrictive. I'm sure ideally you are going to want to use your own code editor on your machine for most Worker development. This is where wrangler comes in.
Step 2b - Using wrangler
Wrangler is the open source CLI tool you can use to manage and deploy your Workers from your local machine. It comes with great documentation on how to set it up, but I'll cover it here too for completeness. First, I'd recommend creating a new directory for your Worker code.
Install
You can use npm to install wrangler by using the following command:
npm install -g @cloudflare/wranglerAuthenticate with your Cloudflare account
Running the following command will start the authentication process:
wrangler configThis will then ask you to enter an API Token, I go through this process below.
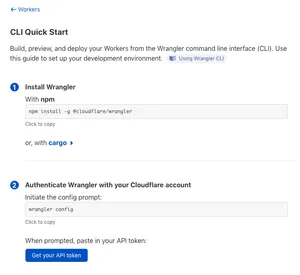
Create an API key process
Via the CLI Quick Start you will find a 'Get your API token' button, or you can go to it directly via this link:
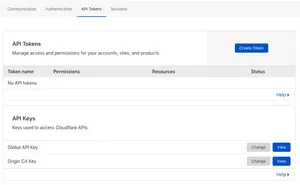
This then brings you to a screen to start the creation process. Click the 'Create Token' button:
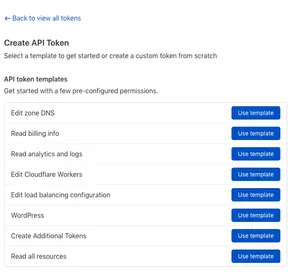
We then get the option to create a Token from a set of templates. Click the 'Use template' button on the 'Edit Cloudflare Workers' row:
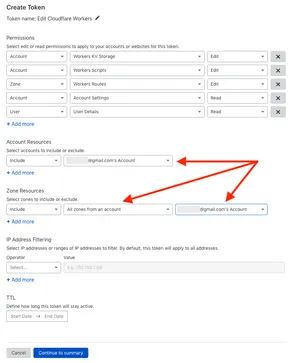
The 'Edit Cloudflare Workers' template will show. Most of it can be left with the defaults. Just populate the dropdowns highlighted in red and click the 'Continue to summary' button:
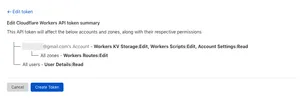
Last step in the process is to review the summary page and click the 'Create Token' button:
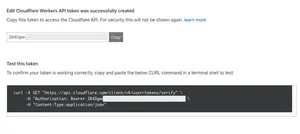
The final page is the one that gives you the actual token you need for authorisation with Cloudflare. Make sure to copy this down as it is only displayed once for security reasons. If you don't you will need to repeat the whole process again!
When prompted in your terminal, you should paste in the API token you've just created above. wrangler will then run through the configuration process. Once complete you are now authenticated to make changes to your worker file locally.
Start a project from an existing template
The quickest way to get up and running is to use a pre built template. You can do this by running the following command:
wrangler generate my-project https://github.com/cloudflare/worker-template
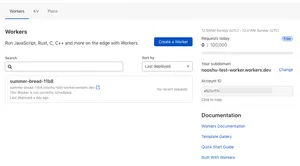
This will create a my-project directory with the required worker files you need. index.js is where your Worker code exists. The wrangler.toml file is the configuration for this Worker. You should edit this file and add in your account_id. This can be found on the Workers overview page:
Once done, save the edited wrangler.toml file.
Preview the worker
Last step is to preview your new worker. You can do this by running the command below (make sure you are in the Worker directory we created with above):
wrangler preview
This will output a URL to the command line and automatically open your default browser with your new Worker visible:
Now admittedly this isn't the most exciting example, but we now have a solid base to work from. When it comes to editing and redeploying this code simply edit the index.js file with your changes then run:
wrangler publish
This command will push your changes up to the Worker that you can then view on the Worker subdomain you chose earlier. For this example it was https://my-project.nooshu-test-worker.workers.dev.
That now completes the setup of the Worker, so we can finally move onto the more interesting part: Making it actually do something useful!
Step 3 - Write some code
So my basis for the Worker code is the boilerplate code I listed in my 'Cloudflare Worker recipes for frontend performance testing', which you can find here (opens in new tab). We are going to take this code and use it as a template to modify the BBC News homepage.
What do you want to change?
So the next decision for you to make is what exactly do you want to change on the site you are testing? I've compiled some common web performance tasks in the recipes blog post, but it's completely up to you as to what you want to change. The question to ask yourself is: "What changes can I make to this page to improve performance?". Now the experiments themselves may actually make no difference at all, or even make performance worse! But at least you've found that out early in the process, allowing you to iterate quickly and try again.
So for this silly example I'm simply going to change the BBC News font from the standard font to:
font-family: "Comic Sans MS", "Comic Sans", cursive;It's a completely pointless example but it illustrates how you can use a Worker to manipulate a page.
Working locally in the browser
So before diving into the Worker code you may wish to experiment locally first to work out exactly what changes you would like to make on the page, and persist them across page reloads. For this I'd recommend the incredibly useful Chrome feature called 'Local Overrides'. Local overrides allow you to make modifications to a page asset on your local machine, that will then persist across page reloads. So the browser will choose to use your local copy, rather than the network version from the website.
Working in the 'cloud'
Another option you have is to work within the Cloudflare Worker UI I described in Step 2a - Using the user interface (UI). The advantage with this method is you get instant feedback. You can tweak the code on the left hand side and instantly see the result reflected in the response and/or preview window. In the image below you can see that I have:
- Made a request for the exact CSS file that I want to change
https://m.files.bbci.co.uk/modules/bbc-morph-news-page-styles/2.4.1/enhanced.css - Set the
x-host: www.bbc.co.ukheader. - Set the
Accept: text/css,*/*;q=0.1header (since a direct request to the resource doesn't set it automatically). - Modified the body
font-familyfromHelvetica,Arial,freesans,sans-serifto'"Comic Sans MS", "Comic Sans", cursive;'.
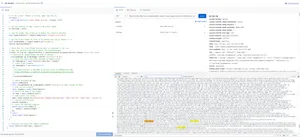
We can see the modified response body in the built in DevTools console window, so we know that the changes we're expecting are reflected in the resulting response. These changes once deployed to the Worker will modify all CSS files that pass through it., but there's a recipe where I restrict that to a single CSS file if needed.
One annoying downside to working in the UI is it's quite restrictive in terms of space for editing. So if you want to use your local code editor the complete code from the above image can be found in this gist (opens in new tab). If you prefer a version without the comments, see here (opens in new tab).
Working in your text editor
The last option, and the one I find most convenient is working from my standard code editor, since this fits in with my usual workflow. Once set up, it is dead simple to make changes. Simply edit the index.js file in the worker directory we created earlier with the changes you want, then publish the changes to Cloudflare using wrangler publish. These changes will be deployed instantly and also automatically reflected in the Worker UI we used earlier.
Step 4 - Web performance testing
So what's the point in making web performance changes if you can't measure the difference between results? This is where WebPageTest comes into play. Once configured we can easily test our website performance before and after the modifications and compare the results to see if we have improved performance (or made it worse!)
For this we are going to use some basic WebPageTest scripting:
overrideHost	www.bbc.co.uk	my-project.nooshu-test-worker.workers.dev
overrideHost	m.files.bbci.co.uk	my-project.nooshu-test-worker.workers.dev
navigate	https://www.bbc.co.uk/news
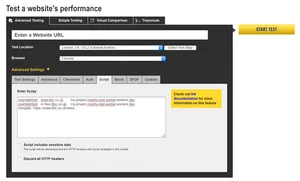
What the code is doing above is redirecting requests the WebPageTest browser is making to specific domains through the Worker so they can be modified as required. WebPageTest will automatically add a different x-host request header to the requests coming from each domain when it does this.
Simply edit the above script as needed and then run a test. If you are unsure how to run a test, I have a blog post here all about it.
Note about the x-bypass-transform header
So in many of the recipes written with WPT and CFW's there's sometimes a custom header (x-bypass-transform) you can add to bypass any page transformations. Using this allows for a more accurate web performance measurement since you are running the 'baseline' page (as in no changes), as well as your modifications through your Worker. This makes them more directly comparable. Unfortunately in the example detailed above CORS reared it's ugly head and broke all the font loading when any custom headers were added to the test using the addHeader WebPageTest script. So I stripped out the bypass code from the example gist for this particular test.
What I believe is happening is the custom header is being added to the font request like so: access-control-request-headers: x-custom-header-123. This is triggering a preflight request (:method: OPTIONS) to check to see if this header is allowed. The server responds back with access-control-allow-headers: * and then the font fails with a 403. This makes absolutely no sense to me at all. I assume the preflight is failing authorisation for reasons... then causing the 403. So yes, I still hate CORS! If anyone has an explanation as to why adding any header to a request ends up killing the web fonts responses, please do let me know!
Step 5 - Result
That's it, you're done. If all has gone to plan the results of your modifications should be visible within the WebPageTest filmstrip. The requests and responses have been routed through our Worker, with the response being modified on the fly before being received by the WebPageTest browser agent:

The results of my silly change can be seen below:
Before

After

The before image shows the standard page being run through our Worker with no changes made. In the after image I've swapped out the font for 'Comic Sans'. It's a simple visual example that has no performance effect on the page as all the fonts are still loaded anyway, but using the same methods listed above you can make many different changes to a webpage and test the difference it makes to the page performance. And as a bonus no production code was harmed during this experiment!
Summary
We've covered a lot in this post. Setting up a Cloudflare account all the way through to writing Worker code to modify a CSS file on the fly. Hopefully this post will have introduced you to the basics of using Cloudflare Workers for web performance testing. If you have any feedback, or recipes of your own please do let me know! P.S. this worker used in this blog post has now been deleted, so my-project.nooshu-test-worker.workers.dev will give you an error if you try it.
Post changelog:
- 14/03/21: Initial post published.