Migrating from Github Pages to Netlify & Cloudflare
So in recent months I've had a fair bit going on in my life which has held me back in many ways, but also pushed a few things up the priority list too. One of the areas that has been bumped up the list is the current setup of this very blog. So I decided to clean up the years of "it still works, why would I change it", technical debt. Isn't it incredible how many years you can do this for!
Dreamhost
Just a very brief look back on the history of the blog and allow me to vent a little. Feel free to jump to the next section if this is of no interest to you.
I started using Dreamhost for my hosting & domain registrar back in April 2006, just over 15 years ago! At the time this was because they offered a lot in terms of functionality all rolled into one. You could easily purchase your domain and set up the hosting quickly. So this became my default option for friends and families websites. The initial version of the blog used WordPress (~v2.0). At the time this was a great way to learn how to work with PHP/MySQL, and WordPress felt like the only real quick ‘self-hosted' option available (I'm sure many will disagree with that statement).
Over the years my Dreamhost control panel just filled with random domains and projects that weren't maintained. So in the past 3 months I decided to clean this all up. Remove all the old unused domains, and migrate any friends' websites over to other hosting options, so I'd no longer need to pay for a service I really don't need. My plan was to try and get friends to open their own Dreamhost account and basically get the Dreamhost team to do an ‘internal transfer' between accounts. Simple right?!
So I contacted Dreamhost telling them my current situation and my plan. Their response was basically: "Sorry to hear of your situation...sure we can help you do that… for this one time admin fee of $99.00 USD...". Isn't capitalism great! Not that I'd expect it to be free, but after 15 years and the fact that I'm trying to get friends to sign up and pay for their services moving forwards, you'd have thought they would have the foresight to waive the fee.
I neither had the drive or the mental capacity to argue the point so left it at that and decided that Dreamhost isn't a company I want to be dealing with anymore, especially not with all the other options available on the market now! So time to transfer everything away, including them as a domain registrar, which is pretty much all it's been used for with this blog for many years anyway.
Github pages
This blog is built using the static site generator called Jekyll. It works okay, but can be a bit of a dependency hell when updating as it is all built on Ruby. The great thing about this setup is that it integrates really well with Github (GH) Pages. There's a whole guide on how to set up a new site really quickly here. So this is what I did for many years. I didn't even bother setting up a custom domain, the blog just existed on nooshu.github.io (more on this later). Once configured, just write your posts in Markdown, push your changes to the repository and GH pages will handle the rest.
The downside with this setup is:
It's fairly limited. You can only use specific Jekyll plugins supported by GH pages. So you can't take advantage of all plugins available. It's a paid for only option if using a private repository (which my blog is). I don't want to change this restriction.
In all honesty it's mainly the paid for option that I'm looking to remove. Not to be too blunt about it all, but should anything happen in the coming months, future payments wouldn't be made and the blog would soon be taken offline.
Netlify
This is where Netlify steps in. Netlify is a Git-based workflow and powerful serverless platform that can be used to build, deploy, and collaborate on web apps. It comes with a fantastic ‘Starter' plan for personal projects, hobby sites, or experiments. I can't even tell you how simple it is to set up a site if you're already using Jekyll. Literally point Netlify towards your site repository, a minute or so later you'll have yourself an exact copy of the site (although on a randomly assigned URL, but we will get to this part soon). If this hasn't convinced you to give it a try, it is also been supported and maintained by a fantastic bunch of amazing developers like:
Now technically you could pretty much stop there. Let Netlify handle the custom domain, DNS, Hosting, SSL, deployment etc as you don't actually need Cloudflare. But where's the fun in that?? So let's layer on Cloudflare anyway!
Cloudflare
Cloudflare are one of the big market leaders when it comes to Content Distribution Networks (CDN) on the web. But don't let their huge size put you off, they still have an excellent free plan that anyone can use to speed up their website. It's incredible the features they offer on their free plan:
There really is so much there for a standard website or a hobbyist looking to do some web performance experimentation.
Another bonus is that they can also act as a domain registrar either for new domains, or to transfer existing domains to them. So this is what I've done. My Dreamhost domains have now all been transferred to Cloudflare and are all in a single place.
Setting it all up
Enough of the babbling, let's dig into setting it all up!
Domains
First thing I did was to start the domain transfer process. Dead simple to do. Make sure the domain is unlocked, grab the auth code from the previous registrar then wait 5 days… It's annoying that you wait 5 days for this but Dreamhost doesn't give you an option to bypass the ‘cooling off' period. It would be great if there was an option to start the transfer process right away, but alas it is what it is. I did this via Cloudflare Registrar, but any will work in mostly the same way.
Netlify
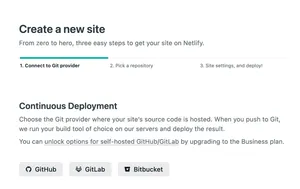
As mentioned above, Netlify is so simple to get setup. Click the "New site from git" button, select your repo and configure your build settings.

Clicking the button will bring up the following options:
A few minutes later you'll have a new site on a random Netlify URL that you can easily access.
SSL Certificate + DNS
This is where it got slightly more complicated. By default you could leave Netlify to handle the DNS settings and SSL certificate, but since we want to front our site with Cloudflare we have to make a few changes.
SSL Certificate
So we aren't going to use Netlify to provision the SSL certificate, we are going to be using Cloudflare. This is important if you want to use the CDN functionality of Cloudflare. As it is the "front" of the website, we are going to be using Netlify as the origin server.
An SSL certificate provisioned by cloudflare will allow encryption of traffic between the origin (Netlify) and the CDN (Cloudflare). I believe this is also important when it comes to using the HTTP/3 + QUIC functionality that Cloudflare offers on their free plan. This is because TLS is very much embedded within the QUIC protocol, rather than a separate layer like it is in HTTP/2. So if Netlify were to handle the SSL certificate, it would limit our ability to use HTTP/3. Note: this is just an educated guess of mine. As I could only get HTTP/3 + QUIC to work when Cloudflare provisioned the SSL certificate.
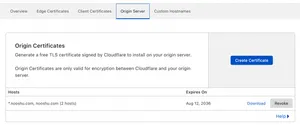
So first you need to generate an origin certificate in the Cloudflare control panel for your domain:
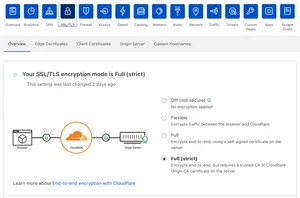
I enabled Full (strict) mode here that requires the Cloudflare CA certificate.
Next you need to enter this certificate info into Netlify via the "Site settings → Domain Management → HTTPS". Click the ‘Add (or Update) custom certificate'.
Install your custom certificate by copy & pasting the corresponding fields into the textareas provided. You will also need to provide the ‘intermediate' certificate details. For this, go to the Cloudflare Origin configuration page and download the Cloudflare Origin RSA PEM file and open it in your favorite text editor. Copy & paste the contents into the last textarea.

Once completed your HTTPS settings in Netlify should look similar to this:
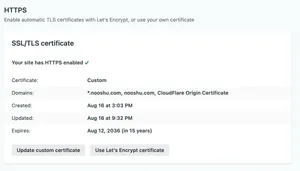
That's about it for SSL certificates. You've now installed the Cloudflare origin certificate on your origin server (Netlify) so they can talk to each other over an encrypted connection.
DNS
Okay, here's the part that I don't mind admitting took me bloody ages to figure out! When it comes to Domain Name System (DNS) I know enough to be dangerous, but not enough to be useful! So there was a fair amount of head scratching and trial and error to get this all setup. It doesn't help that these settings take a while to propagate across the internet. So you never know if they are still propagating, or if you just broke something! For ease, here are the settings I currently have in place in my Cloudflare DNS panel:
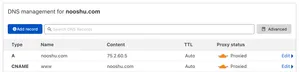
First we have an A record pointing to Netlify's load balancer IP address (75.2.60.5). More info on this is available on their "Configure external DNS for a custom domain" page.
Second we have a CNAME record pointing www to nooshu.com. I don't want the ‘www' in my URL, so it is just being pointed to the bare domain (https://nooshu.com).
Note that for both of these records the ‘Proxy Status' column is set to ‘Proxied' (notice the orange cloud). This is important as we want to make sure the hostname is running through Cloudflare as our CDN provider.
Under this panel I pointed the domain to the Cloudflare Nameservers (braelyn.ns.cloudflare.com and cartman.ns.cloudflare.com). Finally in the DNS page I enabled DNSSEC. This isn't required, but it adds a layer of extra security by protecting against forged DNS answers. It comes for free with the free plan, so may as well I guess! (Unless anyone knows otherwise?)
That's it for the Cloudflare DNS page! A little word or warning: if you go back to the Netlify ‘Domain Management' panel you will see some scary looking warning messages next to your custom domains.

These are fine to ignore. It's simply because the domain's DNS isn't being handled by Netlify, it's been handled by Cloudflare.
Netlify Forms
This is an optional extra. If your site requires a contact form you can't go wrong with Netlify. It comes with the ability to manage forms and submissions without any server-side code or JavaScript. It's all done via Netlify Forms. It is dead simple to set up and comes with built-in spam protection via Akismet and an optional honeypot field. All for free (up to a certain usage limit).
Next up is email setup. Ideally I wanted name@domain.com to forward to my GMail account, but Cloudflare doesn't handle emails at all. Thankfully I found an excellent free service to do this called ImprovMX. Simply enter the alias you require and the email address you want to forward too, then follow the instructions given. You enter all these details into your Cloudflare DNS panel. An example of my setup is below:

That's all there is to that really. Quick and simple!
Redirects
This was a big concern for me at first. My blog has been on the default Github domain for a number of years (nooshu.github.com). So what would happen if I suddenly changed to nooshu.com? Would all the links built up over the years just break? Github pages is very limited as to what you can do technically. It's not like it uses Apache for example, where you can use something like mod_rewrite to create redirects.
Thankfully Github does come with some useful functionality to help in this situation. Navigate to ‘Settings → Pages → Custom domain' page. Enter the domain you wish to serve the site from into the input box. Behind the scenes this will create a CNAME file in the root of the repository that will redirect users to the new domain.

So in my case nooshu.github.com redirects to nooshu.com automatically. Assuming you keep the rest of your URL structure the same, you should be all good to go!
Web Mentions
I use Webmentions on my blog. I actually wrote about how I do it here. The ‘issue' with using web mentions via the Webmention.io service is that it is tied to a particular domain. But what happens once the domain is changed? Suddenly all the webmentions that were associated with nooshu.github.io are no longer pulled in since the blog has moved to nooshu.com. Thankfully after a brief chat with Kevin Marks on Twitter a simple solution was found.
In my JavaScript I'm querying for any webmentions that are associated with the nooshu.github.io domain. The webmention.io API allows you to query multiple domains at the same time. So I just modified my JavaScript (opens in new tab) to look for mentions from both domains. This allows for mentions from the past (nooshu.github.io) and also any mentions in the future (nooshu.com) to be collected and parsed. Simple!
Web Performance
This final section of the post was the really interesting part for me. How to get the best performance out of the new Netlify + Cloudflare setup. It's worth mentioning upfront that by default it really isn't optimal. Here's the WebPageTest result for this site before any changes were made. Here I'm testing on a real Moto G4 on a 3G Fast connection. So essentially a low spec device on a slow connection.

So the test result isn't actually too bad in terms of performance. A Largest Contentful Paint (LCP) and visually complete of around 2 seconds on a low spec device is a good place to start. But there are three scores that stand out:
- Security: E
- Cache static content: F
- First Byte: B
All these scores are very much intertwined, but I will go through each of them individually the best I can..
Security
Since this is a small static blog with no admin area or any form of login, security isn't a major issue. But it would be nice to get an ‘A' in this anyway. Thankfully it really isn't that hard to do if you are using Cloudflare as a CDN. Security expert Scott Helme covers most of what to do in his blog post "The brand new Security Headers Cloudflare Worker". If you are looking for a guide on setting up a Cloudflare Worker, I've written a post here you can follow. The issue with the score is that the site is being served with some missing security headers:
Note: There's no need to add these missing headers using a Worker anymore as Cloudflare has just released some new functionality called "HTTP response headers with Transform Rules", see my update below on how to do this.

As you can see from the scan above by securityheaders.com, we are missing 5 security headers (in red). By following Scott's guide and a small tweak related to ‘Feature-Policy` header you can easily get it up to an A+. Here's the headers I have included in my Cloudflare Worker:
let securityHeaders = {
    "Content-Security-Policy" : "upgrade-insecure-requests",
    "Strict-Transport-Security" : "max-age=31536000; preload; includeSubDomains",
    "X-Xss-Protection" : "1; mode=block",
    "X-Frame-Options" : "DENY",
    "X-Content-Type-Options" : "nosniff",
    "Referrer-Policy" : "strict-origin-when-cross-origin",
    "Permissions-Policy": "fullscreen=(), geolocation=(), camera=()"
}
This code, combined with Scott's boilerplate code adds the headers to the HTML response from the CDN. Now you don't necessarily need to use a Worker to add all these headers. You could use functionality that Netlify has available where you can modify the headers coming from the origin using a _headers or netlify.toml file. But I didn't have much luck with this route. Certain headers were being stripped somewhere in the process so I eventually just reverted to using a Worker to do it. Simon Hearne has an excellent blog post all about this, where he managed to get it to work if you are interested. The above setup will also allow you to submit your domain to the HSTS Preload list too, ensuring that the domain (and all subdomains) are only accessible with a valid SSL certificate.
Once the worker is appending the missing headers to your HTML response the score jumps from an E to an A+! Star pupil indeed! All using a Cloudflare Worker that comes for free on the free plan. Win-win all round!
Using HTTP response headers with Transform Rules
As mentioned above Cloudflare have just relesed functionality that allows you to easily modify response headers without the need of a Worker. It's all done via the Cloudflare UI.
Just select your site then navigate to 'Rules' --> 'Transform Rules'. Then create a new set of response rules like below:
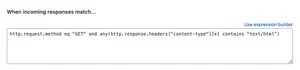
Note: You can't currently use the expression builder to target only the HTML response, but you can paste in the following expression if you only want to target a specific content-type:
http.request.method eq "GET" and any(http.response.headers["content-type"][*] contains "text/html")
Also worth nothing that this feature is on the list to be added to the expression builder. If you don't only target your HTML, your finely crafted Cache-Control asset headers will be decimated and all overwritten with public, max-age=60.
Then I've simply added 9 static rules to the response from Cloudflare:
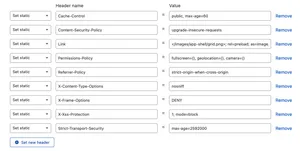
The headers I added can be found below, the top 8 bump the security score from E to A+ on Snyk.io. The final header is a specific preload header for this blog and can be ignored.
/** Important security related headers**/
Cache-Control: public, max-age=60
Content-Security-Policy : upgrade-insecure-requests
Strict-Transport-Security : max-age=2592000
X-Xss-Protection : 1; mode=block
X-Frame-Options : DENY
X-Content-Type-Options : nosniff
Referrer-Policy : strict-origin-when-cross-origin
Permissions-Policy: fullscreen=(), geolocation=(), camera=()

/**Specific preload for my blog**/
Link: ; rel=preload; as=image; nopush, ; rel=preload; as=image; nopush
Once this is done you can deploy and strip all the headers from the worker that exist in the securityHeaders object in the Worker code. Done!
Many thanks to the Cloudflare team who quickly removed a restriction with the Strict-Transport-Security header in a couple of hours. Amazing work!
Cache static content
This is where I first spotted a real performance issue, and many thanks to Anthony Ricaud and Andy Davies for helping me solve this issue. Logging into the Cloudflare dashboard, on the ‘overview' page it gives you a whole set of useful graphs. The interesting one was the ‘Percent Cached' graph:

As you can see from the graph above, it's sitting around a 2% cache rate. For a static site this is truly shocking. There's literally nothing dynamic going on with any of the pages. Why was the cache hit percentage so terrible?
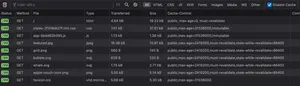
To help debug the issue I used a handy feature that Chrome has built-in, where you can expose a custom header in the browsers network tab. In the case of Cloudflare you want to be exposing the cf-cache-status header. There's an explanation of what this header means here. A quick TL;DR; is that we want as many of our assets to have a value of HIT, which means the asset is stored on the CDN and served to our user from their closest Point of Presence (PoP). As you can see from the image below, we were far from the case!

There's not a single HIT in the above image! No wonder the graph percentage was so low! So what's going on here? Well this is where we have a collision between the Netlify and Cloudflare headers. By default many of the assets served by Netlify come with a Cache-Control header value of public, max-age=0, must-revalidate.
Using Jake Archibald's "Caching best practices & max-age gotchas" and Harry Roberts handy "Cache-Control for Civilians" we can start to make sense of these somewhat confusing header values:
public- this is good, no issue here.max-age=0- This is bad, it forces the cache to revalidate (clears the cache).must-revalidate- Here we are forcing the browser to go back to the server to revalidate and check for a new resource, Harry writes about it in detail here.
The important thing to realise is that even though Cloudflare is fronting the domain, it still looks at, and in many cases, just forwards these headers to the user. So Netlify is effectively asking the CDN not to store the asset and go back to the origin to revalidate the asset on every request. This isn't exactly what we want! This puts load on the origin and also adds to our users Time to First Byte (TTFB), since their nearest PoP isn't being used.
So you may be asking why exactly are Netlify serving up these headers that are very aggressive in terms of anti-caching? Well Netlify has a superb build process that integrates incredibly well with lots of different static build tools. Honestly, if you haven't tried it you really should! Often you can point Netlify at a Github repository and 2-3 mins later you'll have a fully hosted, working, static site you can share with friends and family. One of the huge advantages to this is that you can commit a change to Github and minutes later it is reflected on the live site. No more FTPing changes up to production! Or in other words, Continuous Delivery / Continuous Deployment (CD). For this to work you need to ensure that a developer (or user) has the latest assets from the server. There's no point deploying a change to a site if the browser continues to use an already cached version in a users browser!
Note: There are ways around this by using something called asset fingerprinting. What this does is generate a unique filename based on the contents of the file (usually a MD5 or SHA hash). So for example styles-2f3f4bb27f.css. Now whenever this file changes, even by a single byte, the filename will also change, thus creating a new URL and invalidating the cache. I've done this for the CSS and JavaScript on this blog which you can see if you view your DevTools network panel.
Now, Netlify has no idea if you are fingerprinting your assets, so it can't assume you are. Instead they make sure a user gets the latest assets by defaulting to the Cache-Control headers above. But remember you can override them if you wish using the header options mentioned earlier.
So what did I do to solve the issue? Well I created a simple netlify.toml file and placed it in the root of my project:
# netlify.toml

# remove `immutable` if you don't have file fingerprinting available
[[headers]]
  for = "*.css"
    [headers.values]
    Cache-Control = "public, max-age=31536000, immutable"
    Vary = "Accept-Encoding"

# remove `immutable` if you don't have file fingerprinting available
[[headers]]
  for = "*.js"
    [headers.values]
    Cache-Control = "public, max-age=31536000, immutable"
    Vary = "Accept-Encoding"

[[headers]]
  for = "*.ico"
    [headers.values]
    Cache-Control = "public, max-age=31536000"

[[headers]]
  for = "*.json"
    [headers.values]
    Cache-Control = "public, max-age=31536000"

[[headers]]
  for = "*.png"
    [headers.values]
    Cache-Control = "public, max-age=2419200, must-revalidate, stale-while-revalidate=86400"

[[headers]]
  for = "*.jpg"
    [headers.values]
    Cache-Control = "public, max-age=2419200, must-revalidate, stale-while-revalidate=86400"

[[headers]]
  for = "*.jpeg"
    [headers.values]
    Cache-Control = "public, max-age=2419200, must-revalidate, stale-while-revalidate=86400"

[[headers]]
  for = "*.svg"
    [headers.values]
    Cache-Control = "public, max-age=2419200, must-revalidate, stale-while-revalidate=86400"

[[headers]]
  for = "*.avif"
    [headers.values]
    Cache-Control = "public, max-age=2419200, must-revalidate, stale-while-revalidate=86400"

[[headers]]
  for = "*.webp"
  [headers.values]
  Cache-Control = "public, max-age=2419200, must-revalidate, stale-while-revalidate=86400"
There's nothing particularly clever about this file. I'm basically pulling out particular file extensions and changing their Cache-Control header values. I'm sure there are ways to simplify this file, if there are please do let me know!. Note: You may notice I've used immutable on my CSS and JS files. This is because I have fingerprinting in action on these files. I'd recommend removing immutable if you don't.
Let's see what this change looks like in the network panel on our temporary Netlify domain:
Well the Netlify origin headers are certainly looking a lot better! You can see the headers we've set in the netlify.toml file are reflected in the responses. Let's see now how this translates when we run it through Cloudflare:

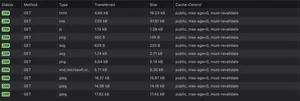
Here I'm using Chrome and exposing the cf-cache-status header for debugging as mentioned above. As you can see it's looking a lot healthier! Here we now have 6 assets with a status of HIT and 2 with a status of DYNAMIC. So most of our page assets now reside in the CDN cache.
We're getting there, but what are those DYNAMIC cf-cache-status's all about? Well Cloudflare still thinks these assets are changing a lot, so they are never cached. The CDN will always go back to the origin for these assets, which is not what we want for a static site. So how do we fix this issue?
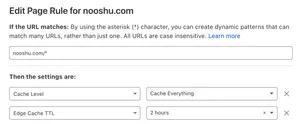
Page Rules
This is where the awesomeness of Cloudflare and their free plan delivers again. They have functionality called Page Rules available to us. Page Rules give you fine-grained control over how Cloudflare handles certain URLs (or URL patterns). Luckily for us, they give you 3 rules on the free plan. More than what we actually need, we'll only need 1!
With the page rules we want to tell Cloudflare to ‘Cache Everything'. Basically everything served from our origin is cacheable. We also want to tweak the Edge Cache Expire TTL. This is the easiest way to override any existing headers coming from our origin. We are going to do this for the whole domain, so I set nooshu.com/* for the URL pattern:
Let's now see what our CDN caching looks like with the above page rules set:

Well look at that! 8 out of 8 assets with a cf-cache-status of HIT! Awesome, we're looking a lot better!
Note: The minimum TTL you can see on the free plan is 2 hours. This means that if you make an update on your origin the CDN won't check for an updated version of the file for 2 hours, unless you purge the CDN cache. I'm personally fine with this limitation. If you decide to pay for the 'Pro' plan this can be reduced to as little as 30 seconds. So it really depends what functionality you need and what you are willing to pay for. You can always do a custom cache purge on a single URL if needed in an emergency, so that's an option too.
We're not quite finished yet. Notice how the HTML page has a must-revalidate value. This value is redundant since our max-age is now set to 1 year, so let's remove it. You could either do this via the netlify.toml or our Worker code. I personally prefer to do it at the Edge so have done it in the Worker. Simply add the following in the Worker securityHeaders object above:
"Cache-Control": "public, max-age=60",
I'd also recommend renaming the object to something new, since it no longer only contains security headers. Adding this line overrides the must-revalidate value sent out in the response from Netlify.
I'm not the only person to write about this problem, Vlad Iliescu has also written about it here, if you want a more detailed explanation.
Bonus: Link Preload Header`
This part is completely optional, and totally depends on your domain and use case. Using a Worker it is dead simple to add and test the Link Preload HTTP Header. This is a header that is sent along with the HTML file that tells the browser to immediately request certain assets you list in the header value. This can be useful for images and fonts for example. Assets that are listed in CSS files have to wait for the CSS to be downloaded and parsed by the browser, before a request can be made to the server to download them. By preloading the asset, it can be cached by the browser and used immediately when needed.
Be warned though, use the preload functionality sparingly, and be sure to test that it actually improves the performance of your website! Read all about the puzzle that is preloading assets in this blog post by Andy Davies. Here it is in action on this blog. This is the single line I added to the Worker:
"Link": "</images/image1.png>; rel=preload; as=image; nopush, </images/image2.svg>; rel=preload; as=image; nopush, </images/image3.svg>; rel=preload; as=image; nopush"So what's the result of all this tweaking on our cache percentage in the Cloudflare control panel? Well it looks a lot healthier:

As you can see from the image above, we've gone from a truly terrible 1.98% cache, all the way up to 87.35% cached, and this is growing hour by hour! Not bad considering how little work we've actually had to do.
First Byte
The last point to cover is the First Byte score which was a respectable ‘B'. For it to be bumped up to an ‘A' we need the TTFB to be around 1 second (1004 ms). Thankfully we've already done all the work to reduce this TTFB time. Our request no longer goes all the way back to the origin (Netlify). Instead it is cached by the CDN and is delivered to our user from their closest geographic PoP. When it comes to latency the speed of light is the limit, so the closer the server is to the user, the better!
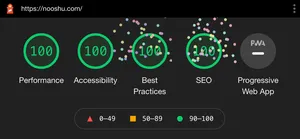
So let's take a look at the final score from WebPageTest with all the above tweaks applied:

That's a lot of green! Considering this is on a low spec device on a 3G Fast connection, more powerful devices on faster connections are going to get an even better experience. Here are some raw stats from comparing my two sets of test runs:
- 16.4% reduction in visual complete time
- 25% reduction in TTFB
- 22.3% reduction in load time
- 16.8% reduction in LCP
And a comparison filmstrip:

And no web performance dick measuring contest would be complete without a Lighthouse report including animated fireworks:
Summary
Well considering this was only supposed to be a "quick blog post", it's turned into a bit of a beast! There's a lot in the post, so let's recap what we've covered and what infusing Netlify & Cloudflare brings to the table for a static sites like mine:
- HTTP/3 + QUIC
- 0-RTT
- Cloudflare Workers
- Preload Link HTTP Header
- DNSSEC
- Excellent cacheability of static assets
- SEO consideration moving from Github pages to custom domain
- Netlify's amazing Continuous Delivery pipeline
- Netlify Forms integration
- Easy email integration via ImprovMX
- Free hosting on Netlify
- Free CDN usage via Cloudflare
- Page Rules for fine-grained cache control
- Improved security
- Improved web performance
It's staggering the amount of functionality and features that are available (for free!) on the web nowadays.
Hopefully you've found this post interesting and useful! As always, feedback and improvements are always welcome. Just let me know via Twitter.
Post changelog:
- 06/09/21: Initial blog post published.
- 06/09/21: Added missing aknowlegements for Anthony Ricaud and Andy Davies for pointing me in the right direction on how to solve the Cloudflare caching issue!
- 06/09/21: Thanks again to Anthony Ricaud for spotting a number of errors in the post. This is why you let folks proof-read posts first!
- 23/11/21: Updated the Worker code to remove the added headers and use the new 'HTTP response headers with Transform Rules' from Cloudflare.
- 09/12/21: Updated the post to include the correct expression allowing you to only target the HTML response with the Response Transform rules. Thanks to Richard Boulton for his help fixing this issue.