Using Image Data Inside the HTML5 Canvas Element
One of the interesting features of the HTML5 canvas API is it's ability to manipulate pixel information at the individual byte level. Reading data and inserting it into the canvas is very simple:
//Select our canvas and context
var canvas = document.getElementById("imageCanvas");
var context = canvas.getContext('2d');
//Select the image from the DOM
var selectedImage = document.getElementById("image");

//Draw the image to the canvas then read in the data
context.drawImage(selectedImage, 0, 0);
var originalLakeImageData = context.getImageData(0,0, width, height);

//Image data is now stored in an array in the form
//originalLakeImageData.data = [r1, g1, b1, a1, r2, g2, b2, a2....]
The data is stored in one long array with 4 values for every 1 pixel in the image (red, green, blue, alpha). Once you have the data inside a variable you can start manipulating it in whatever way you like. I've put together 3 demos displaying some pixel manipulation in action, you can view them here.
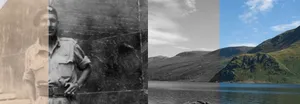
- Slider: This demo simply shows a before and after shot of a photograph I have cleaned up in Photoshop. As you slide your mouse over the image it reads in data from each data set. I find this is quite a good way of displaying before and after shots.
- Pointer: Uses the same image data as the previous demo, only this time a region is picked out of the new image data set and displayed instead of the old image data. This gives the effect of ‘looking through' the old image to the new one underneath.
- Black & White: This demo only uses 1 data set, depending on where you hover the mouse you get a black and white image. The image data is read for every pixel, an average of the colour is calculated and pushed back into the data set. This results in a black and white image.
Some inspiration for the experiment was taken from the extremely useful jQuery Before / after plug-in, which I've yet to use but do plan to in the future.
One issue you may notice is the fact that the swipe is slightly sluggish; this is because as you hover over the image, the JavaScript is looping through every pixel in the image continuously:
//Loop through all the pixels in the image
//Top to bottom
for(var j = 0; j < selectedImageData.height; j++){
    //Left to right
    for(var i = 0; i < selectedImageData.width; i++){
        //Look for our individual pixel info (Times 4 due to RGBA)
        var index = (j * 4) * selectedImageData.width + (i * 4);
        //Do something with the data...
    }
}
That works out to be a staggering 720,000 bits of information in the data array (300px x 460px x 4) per image. The smaller your images are the smoother the effect, so there is a limit to how effective this method can be. I won't be using it on a live project any time soon, but the demos have allowed me to experiment with manipulating image data using canvas.
Note: You may be wondering where the images are from. They are both my own images, one is of my Great Uncle Ben, who along with my Grandfather and their older brother Joe, fought in the Second World War. Here you can see him in uniform in North Africa. The second image was taken by me at Ullswater Water in the Lake District in 2006.