How to read a WebPageTest Waterfall View chart
Table of contents
- Basic Layout
- Vertical lines
- Horizontal timings
- Common scenarios
- DNS-prefetch
- Preconnect
- Prefetch
- Prerender
- Preloading
- HTTP/1.1 vs HTTP/2
- OCSP
- Firefox enhanced tracking protection
- Service worker precaching
- Identifying requests not from the main page document
- Chrome stair-step
- HTML early flush
- Long DOM content loaded (DCL) time
- The never-ending waterfall
- Rogue image downloads (HTTP/2 with SRI)
- Requests with no response body (Error/Status Code: -1 & -2)
- Third party blocking JavaScript
- HTTP/2 prioritisation
- Large Time to First Byte (TTFB)
- Inactivity after SSL negotiation
- Missing component times (DNS, Connect, TLS)
- The impact of a CPU bottleneck
- Misconfigured CORS headers
- Consequences of a 301 redirect when changing a URL
- The missing intermediate certificate
- A
varyunusual waterfall (empty gaps between download data) - Examining undefined 204 status codes
- Service Worker precache slowing a page load
- HTTP/1.1 and the
Connection: closeheader - Content autofill on mobile devices
- Identifying a Cross-Origin Resource Sharing (CORS) connection
- Eager prefetches
- The performance impact of
@font-facesource failures - Double font downloads when using the
preloadresource hint - SVG's opening up a new TCP connection
- Hidden gems
- How the filmstrip view and waterfall chart are related
- What do the filmstrip thumbnail border colours signify
- How to generate customised waterfall chart images
- How to examine detailed information about images on a page
- How to inspect the 'Browser Main Thread' - Part 1
- How to inspect the 'Browser Main Thread' - Part 2
- How to analyse page images for optimal compression and render size
- How to visualise the requests from your test
- How to visualise variance in metrics across multiple tests
- How to add custom marks using the User Timing API
- How to display the bandwidth graph on mobile devices
- How to test a 404 pages web performance
- How to delve into the download chunk data
- How to view a sites HTTP/2 dependency graph (Chrome)
- How to view a sites HTTP/2 dependency graph (Firefox)
- How to view the
console.loginformation from a test
- Conclusion
I often find myself looking at WebPageTest (WPT) waterfall charts, but as I seem to have the memory of a chimpanzee (not a goldfish, that's a myth), I tend to forget some of the details and what they all mean. So I decided to pull together many bits of information into a single blog post I can refer to at a later date. If you find it useful, or think I've forgotten anything, please let me know. If you are interested in learning about the Connection View that sits directly below the Waterfall View, then check out my post 'How to read a WebPageTest Connection View chart'.
Basic Layout
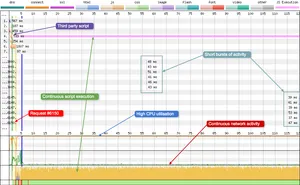
Here's the basic layout of the waterfall chart user interface:
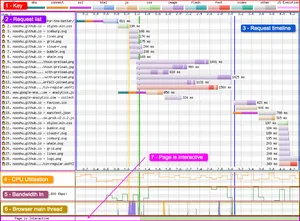
1 - Key
The key shows three types of information:
- Information about the connection status (DNS lookup, connection established, SSL negotiation)
- The type of resource being requested (e.g. HTML, images etc)
- Miscellaneous events (wait, JavaScript execution)
Each resource has 2 colours, a light shade and a dark shade. The light shade signifies the point at which the browser has made the request for the resource. The dark shade is the point at which the resource is actually downloading. See this comment from Pat Meenan for more information. His reply is pasted below:
The lighter time is the time from when the browser sends the request out on the wire until the first byte comes back. The darker color is the period where the resource is actually downloading.
Looks like the production site is using HTTP/2 and the dev site is not which is why you see radically different request behavior.
With http/2 the browser can issue all of the requests to the server in one go and the server will send them back in the order the browser prioritized them (mostly).
with the dev server, the browser can only make 6 requests at a time and has to wait for each to complete before issuing more.
Generally, all else being equal, HTTP/2 will perform better so it is going to be hard to compare your dev work to the production system without having the same serving architecture.
The "wait" visualisation is a new addition to WPT. It shows you the time between when the browser first discovered the resource on the page, up to when the request for the resource was made by the browser to the server.
2 - Request list
A list of assets the browser has discovered on the page and the order in which they were requested. Note the request number on the far left, as well as the yellow lock if the request is being made over a secure connection (HTTPS).
3 - Request timeline
The timeline shows the time along the horizontal (x) axis verses each request made on the vertical (y) axis. From this you can see the lifecycle of a request made by the browser. From discovery (wait), through to request being made, and finally to asset being download.
Ideally you want to make sure this timeline covers as little time as possible, as this indicates better overall performance. The thinner the timeline, the quicker the page loads for a user.
4 - CPU Utilisation
A simple graph showing the CPU utilisation of the browser process running on the device. It displays how much CPU the current webpage is using at any point in time. It ranges from 0 - 100% utilisation. See this comment from Pat Meenan for more information. His response is also quoted below:
The CPU utilization line is the CPU utilization of just the browser process that is running the test (same as you would see in task manager) on a fixed scale from 0-100% (sampled in 0.1 sec intervals).
There are lots of things that cause the CPU utilization to spike but javascript is a very common contributor (particularly if there are gaps in the waterfall where the CPU is pegged at 100% - telltale sine of javascript that needs optimizing). The CPU will also get exercised as the browser figures out how to layout the page and apply styles and finally, the testing itself can also introduce some spikes (really short spikes when the screen shots are taken for example). If you capture a video then the impact of recording the screen shots will be higher.
Usually if I see something that looks suspicious I'll load it up into Dynatrace Ajax Edition (great free profiler for IE) and run the page through to see if anything jumps out. I'd love to integrate the capture of the profiling data at some point in the future.
Even though it wouldn't really impact the numbers, right now only one test is ever executing on a given machine at a time. We can (and have) run configurations with multiple tests at the same time but when video capture was introduced it killed our ability to run in parallel. I'm experimenting with running the tests in VM's to see if I can get more testing capacity out of the hardware because the machines are pretty beefy and could easily handle 8+ tests in parallel but I won't do it if it introduces any variability into the results.
5 - Bandwidth In
This is an indicator of when data is coming into the browser. The visualisation is helpful to see when the browser is doing useful work vs wasted time. The absolute scale can be ignored, as it isn't very accurate. Use the "Capture network packet trace (tcpdump)" option in the advanced tab on the WebPageTest homepage if you want more accurate results. See this comment from Pat Meenan for more information. His response is also quoted below:
The bandwidth graph is more just an indicator of when data is coming in. I've debated removing it but it is helpful to see when the page is actually downloading stuff (useful work) and when it's not (wasted time). This can help a fair bit when you flush the document early to see the initial chunk of data coming in and to make sure that data continues to come in from then on.
Don't pay too much attention to the absolute scale because the raw measurements will not be very accurate (just by definition in how things are measured from the client side).
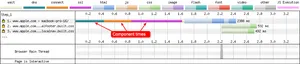
6 - Browser Main Thread
This graph visualises what the browsers main thread is doing at any specific point in time (x-axis). The y-axis shows the percentage from 0 - 100%. The colours were copied from the Chrome DevTools CPU graph (under the performance tab). Here's what each of the colours mean:
- Orange - Script parsing, evaluation and execution
- Purple - Layout
- Green - Painting
- Blue - HTML parsing
- Gray - Main thread time used for task processing not accounted for in other categories
Using this graph it is possible to see if the CPU is becoming a bottleneck in one of the above areas.
7 - Page is Interactive (Long Tasks)
This graph gives you an indication of when the main thread is blocked. The red blocks indicate that the main thread has been blocked for 50ms (which will also block inputs like button presses). Green indicates the thread isn't blocked. Note: it still may be possible to scroll during red blocked phases, as scrolling is usually handled off the main thread for most browsers. See this comment from Pat Meenan for more information. His response is also quoted below:
Scrolling will generally be fine since it is usually handled off-thread for most browsers as long as there are no active scroll events attached. Clicking should be delayed but not necessarily for the full duration of the red (though the first one looks like a single executing JS function so it would be for the full duration of that block).
The red blocks are any point where the main thread is blocked (including from input) for 100ms. A lot of separate 100ms events can make it look like a long block or a single really long event can also show up (which could be a way worse experience).
How did you measure being able to click on a link during one of the red blocks? You'd have to have a test machine handy with a similar CPU and connectivity and then try to click in the UI immediately after it starts to render.
Note: As of Feb 2021 "Page is interactive" was renamed to "Long tasks". Everything stays the same, it's only a name change.
Vertical lines
You can see the key for each of the coloured vertical lines below the "Waterfall View" header as seen below:

But what do each of them mean?
Start Render - Green line
This is the first point at which a user will see pixels painted to the page. The pixels could be from anything at all (background colours, borders etc), not necessarily content. Before this point the screen was blank. This metric is measured by analysing individual video frames that are captured during the page load. See comment from Pat Meenan for more information (see below too):
Start render is measured by capturing video of the page load and looking at each frame for the first time the browser displays something other than a blank page. It can only be measured in a lab and is generally the most accurate measurement for it.
msFirstPaint is a measurement reported by the browser itself about when it thinks it painted the first content. It is available from javascript and can be reported from the field. It is usually pretty accurate but sometimes it reports the time when the browser painted nothing but a blank screen.
First Contentful Paint - Light green line
Note: In March 2021 the old 'RUM First Paint' line was replaced with First Contentful Paint.
This is the point where the browser renders anything to the screen that is visually different from before navigation (i.e. the blank screen for WPT). This metric is reported using the browser's performance timeline if the test browser supports the PerformanceObserver API. So the value is when it thinks it painted the first content to the viewport.
Largest Contentful Paint - Dark green dashed line
Largest Contentful Paint is an important metric that is part of the Core Web Vitals. It's a user-centric metric that helps developers understand the perceived performance of a web page. In practical terms it reports the render time of the largest image or text block visible within the viewport relative to when the page started to load. Much more information about LCP can be found here.
Layout Shift - Orange dashed line
A pages Cumulative Layout Shift (CLS) score is another metric from the Core Web Vitals. A user-centric metric that measures the overall stability of a page. WebPageTest will highlight every unexpected layout shift that the test browsers API detects. An unexpected layout shift is one that isn't initiated by a users input (e.g. a button press). Much more information about CLS can be found here.
Note: You can have multiple layout shift lines on a waterfall chart simply because you can have multiple layout shifts during the test period. The layout shift line is the only line in the key where this happens.
DOM Interactive - Yellow line
The point at which the browser has finished parsing all the HTML, and DOM construction is complete. Unfortunately it's not a reliable metric.
DOM Content Loaded - Pink line
The point at which the HTML has been loaded and parsed, and the browser has reached the end of the document. All blocking scripts have been loaded and run. The DOM at this point is completely defined. See comment from Pat Meenan for more information. Note the thickness of this line in the key. This is to indicate that this line covers a duration, rather than a single point in time in the waterfall. Pat's responses are also quoted below:
domContentLoaded is a technical event the browser fires when it has finished parsing the HTML and reached the end of the document (which means it has loaded and run run all blocking scripts as well). At that point the "DOM" (all of the elements in the document) is completely defined. The event shows up as a vertical pink bar in the waterfall.
There is a lot of non-blocking content that will still need to load that can radically impact the visual experience though (images and fonts in particular).
Visually Complete is measured from a video capture of the viewport loading and is the point when the visible part of the page first reached 100% "completeness" compared to the end state of the test.
Visually Complete can happen before domContentLoaded when the browser is busy parsing and executing things that aren't visible at the top of the page. A likely cause is blocking scripts at the end of the document. They don't visually impact what the user sees in the viewport but the parser can't reach the end of the document and fire DCL until it finishes downloading and running them.
On Load - Lavender line
The point at which the window load event fires. All objects are in the DOM and all images and scripts have finished loading. Note the thickness of this line in the key. This is to indicate that this line covers a duration, rather than a single point in time in the waterfall.
Document Complete - Blue line
The point where the onload event has fired and all the static image content has loaded. Content changes that are triggered by JavaScript execution may not be included.
Horizontal timings
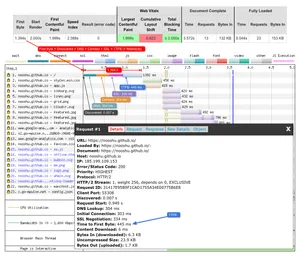
So let's now concentrate on the request timeline (3). What do the horizontal blocks mean and what metrics do they refer too? Well, if you click on an individual request you will see a popup with a lot more information, as seen in the example below:
So lets take a look at a few of the requests from this waterfall view, as it gives us a number of quite varied requests to look at.
Request 1 - The HTML
Here the browser is requesting the HTML document, so at this point in time it is also having to setup the connection to the server. In the request details we are given the following timings:
- Discovered: 0.011 s
- Request Start: 0.116 s
- DNS Lookup: 27 ms
- Initial Connection: 25 ms
- SSL Negotiation: 43 ms
- Time to First Byte: 315 ms
- Content Download: 40 ms
I've annotated the request to show what each of these timings mean:
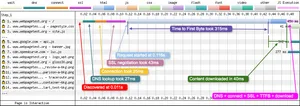
Adding the DNS, Initial Connection, SSL negotiation, Time to First Byte (TTFB) and the Content download times gives you the 450ms that is displayed directly after the request finishes.
It's worth noting that WPT follows a specific convention in the request details panel:
- If the time corresponds to a duration, it is measured is milliseconds (ms), e.g. the DNS lookup took 27ms.
- If the time corresponds to a starting point, it is measured in seconds (s), e.g. the request started at 0.116s.
Request 7 - A third-party JavaScript file
This request is different from the other requests examined because the file is coming from a different domain. The request details give the following timings:
- Discovered: 0.473 s
- Request Start: 0.702 s
- DNS Lookup: 28 ms
- Initial Connection: 39 ms
- SSL Negotiation: 153 ms
- Time to First Byte: 48 ms
- Content Download: 9 ms
Notice how the browser needs to go through the whole connection negotiation again (DNS, Connection, SSL negotiation) because the file exists on a different domain. This adds a fair chunk of time to the request (28 + 39 + 153 = 220ms).
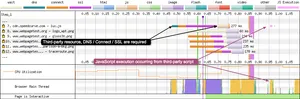
The other interesting point about this request is the script executes around 200ms after the download is complete. There's no information about this execution in the details panel, but you can see it in the waterfall as light pink lines after the request and orange in the "Browser Main Thread" panel (6) which signifies "Script parsing, evaluation and execution".
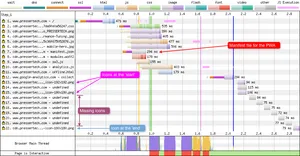
Request 15 - A sponsor PNG
With this request the browser has discovered a PNG image and requests it from the server. In the request details we are given the following timings:
- Discovered: 0.652 s
- Request Start: 0.824 s
- Time to First Byte: 214 ms
- Content Download: 28 ms
Wait time is calculated by subtracting the discovered time from the request start time. The wait time is the time taken from when the browser first finds the asset, to the time when it has the capacity to send a request to the server.
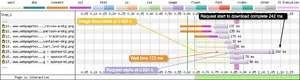
The duration after this request is the time taken from the request being made, to when the request is completed (Time to First Byte + Content Download). Since a connection to the domain has already been established, there's no need for DNS, Connect, SSL negotiation.
Request 23 - GIF file moved
Although request 23 looks quite unremarkable, there are a couple of things going on. The background of the request is yellow. This is to signify a server response status code that isn't the usual 200. In this instance it is a 302 status code, which signifies the GIF file has been temporarily moved. In fact all responses with a 3xx status code will have a yellow background. The request details show the following information:
- Error/Status Code: 302
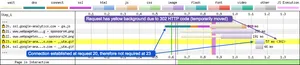
Notice how request 23 doesn't require a TCP connection to be established. This is because it has already happened for this domain on request 20.
Error status codes 4xx and 5xx are displayed in a similar way, only the background is red, like in the example below (note this image is from a different test):
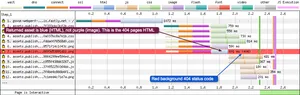
The request details show the following information:
- Error/Status Code: 404
Notice the colour of the returned resource response in this instance. Rather than being the expected purple colour for an image, it is blue signifying that it is an HTML page. Or, in other words, it is the server responding with the 404 page because the asset can't be found.
Download chunks
Another visual peculiarity you may be curious about is the vertical stripes in each of the requests. As mentioned earlier, the lighter colour signifies the request has been made and the browser is waiting for a response. The darker colour indicates that bytes for the specific resource are being delivered to the browser. Now sometimes this doesn't happen all at the same time. This results in what looks like zebra striping, where the browser is being drip-fed bytes over time. These are called download chunks (red arrows).

This is very visible when an HTML early flush technique is being used (request 2 - see scenario below for more details) or if a large number of assets are being downloaded in parallel and are competing for resources (requests 3-9). Note the bandwidth graph at the bottom of the UI is maxed out from 1.6 to 2.5 seconds.
You may be asking "but this chunking also occurs after the bandwidth usage drops (2.6 seconds+), so what is happening there?". Well the number of parallel connections has dropped so less is downloading in parallel. But the connections that have been created in requests 12 - 15 are still in the TCP slow start phase, so the the assets are still competed for (now limited) bandwidth.
Inline script execution
In the above section about A third-party JavaScript file I already mentioned how the JavaScript execution is visible if you look along a request row and identify the pink lines. But in that example a third-party script was used, which was loaded via a script tag pointing to another domain. But say for example you had a number of inline scripts in your page (Google Analytics, Dreamweaver MM_preloadImages etc). How would they be visualised?
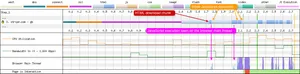
Here we see the browser downloading chunks of HTML, then in very close proximity to these downloads we see JavaScript execution lines (in pink). This is from JavaScript that is inline in the page that is executing. If you look very closely in the browser main thread you will see both HTML parsing (blue), and very small slithers of yellow to indicate the JavaScript execution.
This waterfall is also a prime example of HTML early flush which I go into more detail later in this blog post.
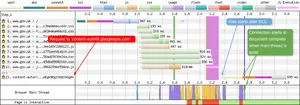
Updated JavaScript execution visualisation
A recent update to WebPageTest has made the JavaScript visualisation on the waterfall chart even more useful. If we take a look at how it used to look:

In this example above we see a solid block of pink execution. But the question is, is this very intensive JavaScript running or just short but fast repeated execution? Both of these would look exactly the same on the previous version of the visualisation. Now if we compare this to the new version:

Now when JavaScript execution is rendered you don't always just see a solid block of pink. The height of the pink execution bars indicates how quickly the JavaScript ran. So fast but frequent JavaScript execution will have very short height bars, so they no longer dominate the view.
Different First Byte values
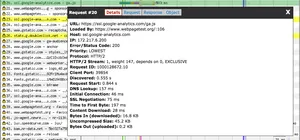
In the details tab of a set of test results there is a summary table right at the top of the page. It displays some of the most important metrics for quick review. These metrics include 'Web Vitals', 'Document Complete', and 'Fully Loaded'. To the far left of the table you will also see a 'First Byte' column. An eagle eyed reader may also spot a 'Time to First Byte' listing when you click on the pages HTML request (see example waterfall). What's unusual here is that these two values are different, So let's examine what is happening here.
In our listing panel for the HTML we see:
- Discovered: 0.007 s
- DNS Lookup: 304 ms
- Initial Connection: 303 ms
- SSL Negotiation: 334 ms
- Time to First Byte: 445 ms
The 'First Byte' value seen in the top table is the sum of all these values (Discovered + DNS + Connect + SSL + TTFB). So it is basically the time taken from navigationStart to the browser receiving the very first byte of data from the server. It's also worth noting that if there are any redirects during this time (not seen in the example waterfall), they will also be included in the 'First Byte' value. Where as 'Time to First Byte' in the listing panel is simply the time from request start, to when the first byte of data was received. It's easier to explain via an annotated waterfall diagram:
Common scenarios
Here's a list of common patterns seen in a WPT waterfall chart. I'll add more of these over time as I encounter them.
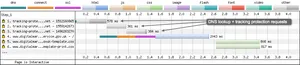
DNS-prefetch
DNS Prefetch is part of the Resource Hints Working Draft. It gives a developer the ability to tell the browser that a DNS lookup is going to be needed for another domain in the near future. So instead of waiting, start the lookup immediately. By the time the domain is actually required, the browser will only need to complete the TCP handshake, and optional SSL negotiation. It looks similar to the preconnect example below, in that it is "floating" in the timeline. But here only the DNS lookup (green) is visible.
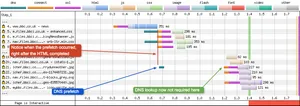
Notice where the dns-prefetch occurred in the timeline: almost immediately after the HTML has finished downloading and is parsed. It is easy to see the difference if you compare it to the connection negotiations happening in requests 5 and 7, where preconnect is being used.
Preconnect
Preconnect is part of the Resource Hints Working Draft. It allows a developer to give the browser a "hint" that a domain will need to be connected too in the near future. By connecting to the domain early, the connection won't need to be established later in the waterfall, thus allowing assets from said domain to be requested and downloaded quicker when they are required.

As you can see in the image above, the preconnect looks to be "floating" in the timeline. It happens way before the actual request for the image is made. This is the browser using the preconnect hint to connect ahead of time before it is required. For more information on the preconnect hint I recommend reading this blog post by Andy Davies.
Prefetch
Prefetch is part of the Resource Hints Working Draft. It allows a developer to tell the browser to prefetch a resource (e.g. CSS, JS, HTML document) in the current navigation, as it may be required at a later date. For example, if you know the majority of your users navigate to a specific page from your homepage (e.g. maybe your login page), you could decide to prefetch it so it will already exist in the users browser cache when it is required. In the example below I am prefetching another HTML document that sits along a users journey:
With Prefetching 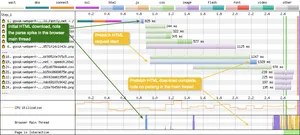
The prefetch is visible at request 19 in blue (HTML). It is worth noting that this prefetched HTML is simply stored in the browser cache. It isn't parsed by the browser. You can verify this in the waterfall chart UI by looking at the browser main thread graph. At the point the the HTML is prefetched, there's no main thread activity registered.
Without Prefetching 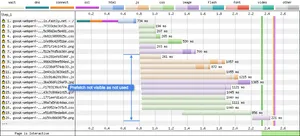
WebPageTest gives us some information in the popup to let us know it is a prefetch hint:
Priority: IDLE(under the details tab)purpose: prefetch(under the request tab)
It's important to remember the priority of a prefetch. In WebPageTest, when testing in Chrome it is listed as priority IDLE. This maps to Lowest priority in DevTools (according to the Resource Fetch Prioritization and Scheduling in Chromium document). So a prefetch is an optional and often low-priority fetch and will be loaded as late as possible by the browser. This differs from preload which is a mandatory fetch and gets a High priority in the browser. A resource loaded using preload is layout blocking, so use it sparingly else it could actually slow down perceived performance.
Prerender
Prerender is part of the Resource Hints Working Draft. It gives a developer the ability to tell a browser what a users likely next navigation could be (assuming the developer is tracking this in some form of analytics). In December 2017, with the release of Chrome 63, Google overhauled how prerender worked. Here's a brief before and after explanation:
Pre-Chrome 63: Chrome would look for the <link rel="prerender"> element and create a hidden page for the URL listed by it. Unseen by the user, this page would be downloaded including all dependant subresources and any JavaScript would be executed. Should the user happen to navigate to the page, the prerendered page would be swapped out with the current tab, giving the user the impression of an instant page load. There were a few negatives to this method. The first, memory usage was high due to having to maintain the state of the hidden page. This made it unsuitable to low-end devices. And second, since user-facing and stateful actions should not occur with a prerender (since the user can't see them), it was a very complex task to achieve this when the whole point of a prerender was to render the page. So the decision was taken to depreciate and remove the then current implementation.
Chrome 63+: Since the release of Chrome 63, the prerender hint is still recognised and followed by Chrome, only it is handled in a much different way. Chrome now uses a technique called "NoState Prefetch" when it sees a prerender link element. If seen it will be followed only if these two conditions are met: the user is not on a low-end device, and they are not on a mobile connection. If followed, the page will be downloaded and scanned for subresources to download. These will be downloaded and cached at the lowest priority possible (IDLE). No JavaScript will be executed on the prerendered page, and should the user actually navigate to the page, the browser will need to load the cached resources into a new browser window (not swapped out as before). A lot more information about "NoState Prefetch" can be found here.
So what does this prerender look like in a WPT waterfall chart:
With Prerendering 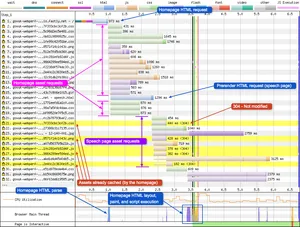
In the waterfall chart you can see the usual page and resources loading from request 1 through to 19. Request 16 is where the prerender occurs. Here you can see a request for a second HTML page. Once completed, this then triggers requests 20 through to 29. Notice how many of these requests have a yellow background with a 304 status code. This is telling us they are identical to a resource that already exist in the browsers cache. They exist here because the homepage HTML above them (request 1) put them there only a few 100ms before. Notice how there's very little happening in the browser main thread graph (other than the homepage parsing which is happening because request 30 (CSS) completed). This confirms that the prerendered assets and subresources are simply being stored in the browser cache for later use.
As with prefetch, WPT gives us a little information in the popup for each prerender resource to let us know the requests aren't from a standard user navigation:
Priority: IDLE(under the details tab)purpose: prefetch(under the request tab)
Note: It doesn't explicitly tell us it comes from a prerender hint, only from a prefetch. Since "NoState Prefetch" is now being used, this actually makes sense.
Without Prerendering 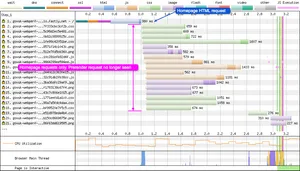
Without the prerender link element you get your standard page waterfall chart. Only requests to the current page subresources can be seen.
Preloading
Preloading is a W3C Candidate Recommendation and is used to increase the loading priority of selected assets. A developer can tell the browser: "this resource will absolutely be needed soon, so load it right away". This technique is often used when loading web fonts.
Without preload, when loading a web font the browser first needs to download the HTML and CSS, then parse both to create the render tree. Only at this point can the browser request the font. This can lead to what is known as a Flash of Invisible Text (FOIT) and Flash of Unstyled Text (FOUT). A way around this issue is to request the web font file immediately using the preload directive.
With Preloading 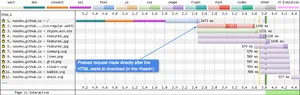
Without Preloading 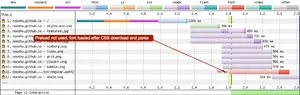
If you compare both of the images above you will see the request for the preloaded WOFF2 font is made as soon as the HTML starts to be downloaded at request number 2 (dark blue strip). The browser parsed the <head> tag, saw the preload directive and made the file request immediately.
Compare this to the second image, where the browser downloads the font after waiting for the HTML and CSS to be downloaded and parsed. Only at this point can the WOFF2 font request be made. As you can see from the image, when preloading isn't used the font is at request number 11. I've written more about font preloading here if you are interested.
HTTP/1.1 vs HTTP/2
HTTP/2 is the next iteration of the HTTP protocol after HTTP/1.1. Due to the fact that HTTP/2 uses a single TCP connection and multiplexes files over this single connection, it is easy to spot the difference in the resulting waterfall charts:
HTTP/1.1 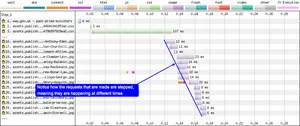
HTTP/2 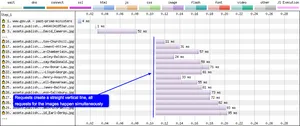
A browser using HTTP/1.1 requests images via separate TCP connections, and this tends to happen at slightly different times (hence the stepped nature of the waterfall). A browser using HTTP/2 on the other hand requests all the images at the same time. It is the server that decides when the images will be sent back to the browser, and in what order.
OCSP
Online Certificate Status Protocol (OCSP) is an internet protocol used for obtaining the revocation status of SSL certificates. One way for a browser to certify a certificate is to connect to an OCSP server for verification. When this happens WebPageTest will show you in the waterfall as seen below:
With OCSP 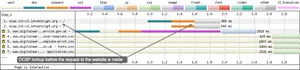
This OCSP check is bad for performance. The verification requires a DNS lookup and an initial connection to the OCSP server. Only once the certificate has been verified, can the SSL negotiation take place to the original domain. As you can see in the image, the whole waterfall is being pushed back. It takes almost 2 seconds before the HTML page can even be requested!
Without OCSP 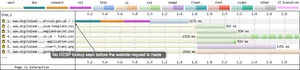
If you compare the with & without OCSP waterfalls, you can see that the length of the SSL negotiation is much shorter for without OCSP (300ms instead of 1000ms+) and therefore the request for the HTML file happens much quicker (at 1 second verses 1.95 seconds). The OCSP check adds 950ms to the initial HTML request on a 3G Fast connection. That's a huge number!
If you notice this on your WebPageTest timelines you should look into enabling OCSP stapling on your server. Note: If you are using Extended Validation certificates (EV), OCSP stapling won't fully solve the issue, see this technical Twitter thread for more details on this. Update: I've now published a whole blog post about certificate revocation that you can view here.
Firefox enhanced tracking protection
Firefox enabled enhanced tracking protection by default as of version 69 (June 2019). The agents on WebPageTest updated around the same time. In some rare cases the tracking protection requests could be seen in the WPT waterfalls (request 1-3):
According to Pat Meenan these requests should now be filtered out by default, so they will never be seen in the waterfall charts.
Service worker precaching
The use of service workers is gradually increasing, and one of the many features they allow is a fine-grain control on what assets are cached and for how long. They also give a developer the ability to precache files for future use (e.g. for offline capabilities). An important detail to remember when precaching assets using a service worker, is the browser may need to download the same files twice. Once for the HTTP cache (the standard browser cache), and again for the service worker cache (Cache API). Theses are two totally separate caches, and don't share assets. These duplicate requests can be seen in a WebPageTest waterfall chart:
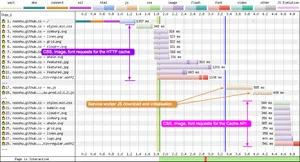
In requests 17 and 18 you can see the service worker JavaScript being requested, downloaded, and initialised. Immediately after this, the service worker looks through it's precache JSON file and requests any assets listed. Note: In the example above the Workbox library is being used to simplify the service worker workflow.
Identifying requests not from the main page document
I mentioned directly above that you could (potentially) identify service worker requests by examining the shape of the waterfall. In the example above there is an obvious 'step' where the main document requests finish, and the service worker precache requests start. But waterfalls from some sites are complex beasts and this shape isn't always visible. So a new feature has just been added, where requests that don't originate from the main page document (e.g. <iframe> and service worker requests) are now highlighted in blue (Chrome only). So it is now incredibly easy to spot when these requests are being made! I believe we all have Andy Davies) (and of course Pat Meenan) to thank for this new functionality.
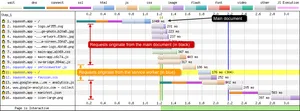
In the above example we see the simple waterfall from the excellent Squoosh image compression progressive web application. Request 10-12 are now highlighted in blue as they all have a different 'Document' value (Document: https://squoosh.app/serviceworker.js) in the 'Details' tab when you click on each request.
Chrome stair-step
Chrome has included a prioritisation technique that is named due to the pattern it creates in waterfall charts. It involves Chrome examining the assets in the <head> tag (before the page even has a <body>), and requesting, downloading, and parsing these requests first. The browser even goes so far as to delay requests for assets in the body until the <head> requests are complete. It is easier to see this stepping in a HTTP/1.1 graph, as seen in the example below (although it also occurs in HTTP/2):
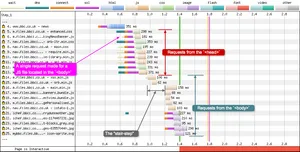
In the above image from the BBC News website, 8 out of the first 9 requests are made for assets in the <head>, with only 1 request to a JavaScript file located in the <body>. The "step" isn't very long in terms of duration, only around 200ms. But it gives the browser enough time to concentrate all CPU and bandwidth on downloading and parsing these assets, so the <head> is then setup and ready to go before the <body> assets are downloaded and parsed.
Not much has been written about this "layout-blocking" phase in Chrome, but it can be seen in detail in the Resource Fetch Prioritization and Scheduling in Chromium document by Pat Meenan, and also in Chrome's resource scheduler source code.
HTML early flush
HTML early flush was mentioned above in the download chunks section. It is when a web server sends a small slice of the HTML document, before the whole HTML response is ready. What this then allows the browser to do is parse the HTML it has received, and look for assets that it can then request early (compared to waiting for the whole HTML document to download, parse, and then request).
With early flush 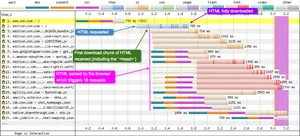
In the example above, the small download chunk of HTML the browser receives (request 2) contains the <head> tag which links to JavaScript, fonts, JSON, preload directives, and dns-prefetch resource hints. This HTML is parsed and 16 requests are almost immediately triggered very close to each other. Note: Notice how I didn't list CSS. CNN.com has inlined the CSS in a <style> tag (so no request to a CSS file is required). They then trigger CSS requests via JavaScript later in the waterfall once the JavaScript has loaded and parsed.
Without early flush 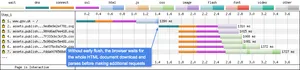
If you compare the waterfalls for with & without early flush (from different sites unfortunately): With flush you will notice how the requests for assets is made during the HTML download response. Compared to without, where the browser must wait for the whole HTML document response to complete. Only then can it be parsed and requests made to other page assets.
Flushing allows the browser to make requests earlier in the waterfall, and therefore makes the page load and feel faster (if implemented correctly).
Long DOM content loaded (DCL) time
The vertical lines on the waterfall chart are usually very thin, maybe only a couple of pixels thick. This shows they take very little time to actually happen. But in some cases the DOM content loaded line takes up a large chunk of time, and you will very easily see it on your waterfall chart! Take a look at the two (different) charts below:
Normal DCL 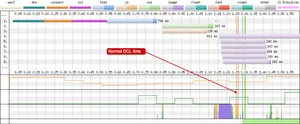
The pink DOM Content Loaded (DCL) vertical line is usually almost instantaneous. Very thin and barely visible on the waterfall chart as it usually occurs around the same time as other events like DOM Interactive & Start Render. This is what a healthy DCL looks like.
Long DCL 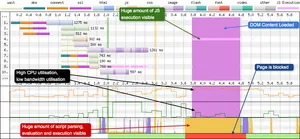
Now compare the previous waterfall chart to the one above and you can easily spot the issue. The DCL line is covering almost 1 second on the waterfall chart! That's not a healthy looking line. In the chart you will see some unusual goings on that can help explain what is happening. The light pink line on request 4 is showing a lot of JavaScript execution is happening, and it just so happens to be the exact same width as the expanded DCL line. The browser main thread is solid yellow, which confirms that a script is parsing. The CPU graph is at around 80-90% capacity over the same time period and the page is blocked. Curiously the "Bandwidth In" graph is hardly registering anything, so whatever is causing the issue has already downloaded and is being parsed.
So what is actually happening? Well, there's some very expensive JavaScript running in the file at request 4. Often this is caused by JavaScript attached to the jQuery $(document).ready() method (or some equivalent). So if you ever see a DCL line eating a large chunk of your waterfall chart, you now know where to look.
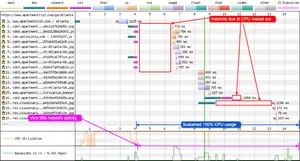
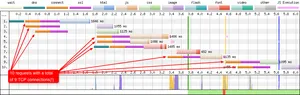
The never-ending waterfall
Occasionally if you have a third party script setup incorrectly, you can end up in a situation where a test will take a very long time to stop, as can be seen in the waterfall chart below:
Yes you are seeing that correctly, 6150 requests logged by WebPageTest! So many in fact that my browser struggles to render all the DOM elements on the page. This is where the ability to customise the waterfall really helps, as you can limit the number of visible requests to a reasonable number.
So what exactly is happening? Well there's a clue in the network activity graph. If you look closely you will observe that it never reaches zero. WebPageTest waits for there to be no network activity 2 seconds, at which point it ends the test. Unfortunately this third party script is executing every 30ms (request 4) and downloading a mere 43 bytes of data each time. Just enough to keep the network alive. It's also worth noting the CPU utilisation graph, which is maxed out over the time period (120 seconds). That's what happens to a device when a script is executing 33 times per second. I've quoted what pat said in multiple comments below:
It just uses the state of the page at the end of the test you are running and considers that the end state. The description in the SpeedIndex docs are intentionally vague because it doesn't apply just to WebPageTest page load tests and could in theory be used for arbitrary videos. Under normal conditions: after the onload event fires for the page, it waits for there to be 2 seconds of no network activity.
You can also change it to stop at the onload event if you check the option in the advanced settings.
There are also other settings that can cause it to wait longer (minimum test duration, waiting for a specific request, etc).
At 120 seconds WebPageTest automatically forces the test to stop. There are a couple of ways to force a test to stop yourself (other than fixing the issue):
- by clicking the "Stop Measurement at Document Complete" check box on the advanced page before you start the test, this will stop the test at the onLoad event
- by using the "setDomElement" script command to tell the test to wait for a specific DOM element to show in the DOM. I've quoted Pat's responses from the links above, below:
WebPagetest will generally wait for 2 seconds of no network activity after the onload event before it considers a page done. It looks like the pins may load after the load event and are loaded by ajax so if there is a delay before that happens then the test will end before they get loaded. You can force it to wait by setting a DOM Element for it lo look for in the advanced settings (assuming the pins have a unique DOM element). In that case the test will keep running until the specified element shows up on the DOM (if there is a specific network request you can also tell it to wait for a network request instead of a DOM element).
WebPagetest is mostly driven by network activity (and the onload event). It doesn't know anything about your javascript running.
There is a "setDomElement" script command that you can use to tell it to wait for a specific DOM element to show up (though not sure how well that works these days - been a while since I tested it).
You can also use the "Minimum Test Duration" (time) in the advanced settings to force it to wait for say 60 seconds to see if that gives you the data you need.
So if you see unusually long tests running, check to see what your third party scripts are doing to the network graph.
Rogue image downloads (HTTP/2 with SRI)
I personally ran into this issue very recently on GOV.UK. The waterfall was showing an image download that at first glance shouldn't actually be able to be downloaded:
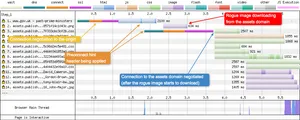
Request number 2 shows an image downloading before the connection to the domain has been negotiated. I've now written a whole blog post "HTTP/2 and Subresource Integrity don't always get on" about this curious case if you want to delve into the details. But a quick TL;DR for you here is: the connection to the "assets" domain in request 2 is using HTTP/2 connection coalescing, so it is using the same TCP connection from request number 1. The requests 3-10 are waiting for an crossorigin="anonymous" connection because Subresource Integrity is enabled on the CSS and JavaScript, hence why it looks strange to be receiving a file from the domain, and making the connection at the same time.
Requests with no response body (Error/Status Code: -1 & -2)
There's more status codes that those mentioned in the Request 23 - GIF file moved section, another two available are codes -1 & -2:

Notice how the above image is requesting assets from the third party domain then immediately failing. It is also possible for this to happen on requests from the same domain, as seen below:
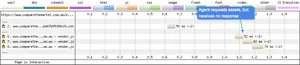
When a request is made but WPT sees no response, it is given the error code of minus 1 or minus 2. This can either mean the response was never sent back by the server, or WPT simply didn't detect it. This can also be seen if you click on the individual requests:
- Error/Status Code: -2
- Content Download: 0 ms
- Bytes In (downloaded): 0 B
- Uncompressed Size: 0 B
- Bytes Out (uploaded): 0.5 KB
There a little more information from Pat in these forum posts Error code -1 and Error code -2 if you are interested. Pat's responses are also quoted below:
-1 is a default error code for when a request is sent but there was no response (or the response wasn't detected by WPT).
-1 and -2 are what the error codes are initialized to and basically mean the request was never completed (there was no explicit error).
Third party blocking JavaScript
Back in the early 2010's there was a recommendation that you should use a third party CDN provider to serve common JavaScript libraries (jQuery, Backbone, Underscore etc). The theory being that as a user navigates the web, these common libraries would be cached by the browser and reused for different websites since they are coming from the same third party domain. Unfortunately things are never that simple. With multiple CDN providers, a huge number of library versions available, aggressive browser caching, and double-keyed HTTP cache, the theory never really panned out. You can see the effect of this externally hosted JavaScript quite clearly in some waterfalls:
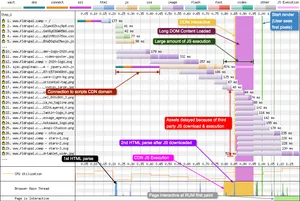
There's a fair amount going on in this waterfall chart. Request 13 is the important one to focus on. This is the browser requesting a version of jQuery from the Google Hosted Libraries CDN. The connection takes a while to negotiate, then the download takes a chunk of time because bandwidth is being used for other requests (11, 12, 14). Only once the script has downloaded does a whole bunch of other activity start. The JS is executed and there's a 2nd HTML parse by the browser, which suddenly triggers lots of requests for images. Notice where the "Start render", "RUM first paint", and "Page is Interactive" green graph appear on the chart. They are all being pushed back along the waterfall because of this single third party script request.
And that's why it is now recommended you Self-Host Your Static Assets. This example was sent over by Mike Herchel and if you are interested in what happens once you remove the third party JS, check out his thread here.
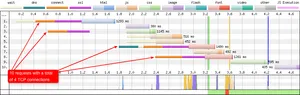
HTTP/2 prioritisation
HTTP/2 is different to HTTP/1.1 in the fact that it aims to use a minimal number of TCP connections (1 or 2). Whereas for 'optimal' HTTP/1.1 performance the browser opens 6 TCP connections to a single domain, thus allowing 6 assets to be downloaded at a time, HTTP/2 is different. It introduces multiplex streams over a single TCP connection. A very simple explanation of this is:
- The browser opens a TCP connection to the server and downloads the page HTML
- Browser parses the HTML and looks for all other page assets (CSS, JS, Fonts, Images etc)
- Browser sends a list of assets it needs to load the page to the server, and the priority it would like them in
- It is then up to the server how it delivers these assets to the browser and in what order (ideally using the browser prioritisation as a reference). This is where HTTP/2 prioritisation comes in
- Server then sends multiple assets at the same time via streams across a single TCP connection
How the assets are prioritised depends on how the server has implemented the HTTP/2 specification. A lot more details about H2 server / CDN prioritisation check out Andy Davies' 'http2-prioritization-issues' repository which is used to track results from Pat Meenan's 'HTTP/2 prioritization test'.
The test works by first warming up the TCP connection (seen in request 2 & 3). TCP slow start is part of the congestion control strategy used by the TCP protocol. It is used to stop the server flooding the TCP connection. The server gradually ramps up the speed, while looking to see if any packets are lost along the way. If packets are lost, it drops the speed.
Once the connection is up to speed the browser then requests 30 images concurrantly at a low priority (request 4 to 33). When two low priority images have downloaded (and therefore the network buffers are filled), then it requests a high priority image. The priority of the image is sent to the server along with the request (if the browser supports it), and is decided by the browser using the rules set out in the 'Resource Fetch Prioritization and Scheduling in Chromium' document. Looking at this document we can see that in Chrome an 'Image (in viewport)' in the 'Load in layout-blocking phase' is given a 'High' priority. Once one high priority image has downloaded, then the browser requests another.
The test has been designed to see how the server copes with H2 prioritisation when it is given a higher priority file to send, while already sending low priority assets. A server that prioritises correctly should divert resources from low priority assets, to high priority assets (so the high priority assets are loaded first).
So let's take a look at a waterfall from good and bad prioritisations, and discuss what is happening:
Good - Fastly 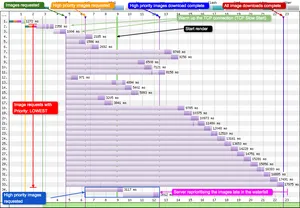
So what exactly is happening in this waterfall? Requests 2 and 3 are warming up the TCP connection. Requests 4 - 33 are images requested with a priority of 'lowest'. Keep in mind that the lower the request number, the faster it was discovered and requested by the browser, e.g. image at request number 4 was seen, and requested before the image at request 20. If the server didn't bother with any form of prioritisation and simply sent images on a first come, first served basis, images later in the waterfall would always be delivered last, since they would always be at the back of the queue. But what we are actually seeing is the server sees a request for the high priority images and it stops streaming the 'lowest' priority data in favour of 'high' priority data, so the high priority images are completed sooner.
Now if you compare this to a CDN with poor HTTP/2 prioritisation:
Bad - Level 3 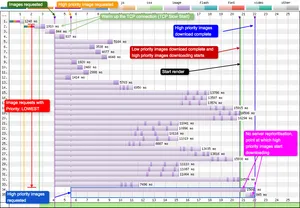
Here we can see the server essentially ignoring the information it's been given in the request about the high priority images. The two high priority images are added to the end of the download queue. The server continues to send low priority data and makes no allowances for the fact that by doing so, it is delivering a suboptimal experience to the user. You can actually see this in the waterfall by looking at the green 'start render' line: for good prioritisation this is at approximatly 9 seconds, for bad prioritisation it is almost 21 seconds!
For more information on H2 prioritisation and many other H2 topics check out Barry Pollard's book 'HTTP/2 in Action'.
Large Time to First Byte (TTFB)
Time to First Byte is the time it takes from the browser requesting the first asset, to the time at which the server sends back the first byte of data to the browser. It consists of:
- Browser requesting the asset from the server (after DNS + Connect + SSL)
- Time taken for the packets to travel from the browser to the server
- Server recieves the request. It then processes and constructs the response and transmits it back
- Time taken for the response packets to travel from the server to the browser
The time taken to travel from the browser to the server is known as network latency. A data travelling there and back again is known as a Round Trip (RTT). So how do you use WebPageTest to identify when you have a large TTFB?
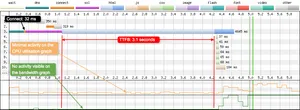
The above test was run on a standard 'Cable' connection as defined by WebPageTest, so the connection has a RTT of 28ms. Now if you compare this value to the TTFB, which is 3.1 seconds, we can see there's an issue here. By looking at the connect negotiation time (in orange on request 3), this gives you an indication of how quickly packets can travel across the network (32 ms in this case). So it's clear to see that the TTFB delay isn't caused by congestion over the network. There is zero activity over the network according to the bandwidth graph, and fairly minimal activity happening on the CPU. To the device is waiting on the server to respond before it can do anything else.
In this case it's the processing time on the server that is causing the delay. Whatever the server is doing to construct the response is taking approximatly 3 seconds. That's a huge amount of time to construct the HTML. There are far too many reasons to list as to why this could be happening on the server, but a good starting place would be to look at the databases queries, hosting settings, server resources available, and the server software that is running. Whatever is causing the issue needs to be identified and fixed, as this will be having a huge impact on the sites users. So if you see a WebPageTest waterfall that looks like this, examine your server setup and try to reduce this time. As Harry Roberts mentions in his article 'Time to First Byte: What It Is and Why It Matters':
While a good TTFB doesn't necessarily mean you will have a fast website, a bad TTFB almost certainly guarantees a slow one.
Inactivity after SSL negotiation
This is quite an unusual waterfall. We see a large Time to First Byte on request 3, but we see a huge gap with apparently no activity at all:
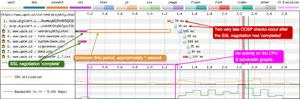
What is interesting about this waterfall is we can see the DNS + connect + SSL negotiation happen very quickly (34ms + 33ms + 80ms respectivly), then there's zero activity on the waterfall, CPU and bandwidth graphs over this time period. This indicates that the device is idle and waiting on work to do. Right towards the end of this period of inactivity we see the browser instigate two OCSP revocation checks. But according to the waterfall the SSL negotiation has completed by this point in time.
I can't be 100% sure why this is happening (it's an old test with no tcpdump log to examine the network activity), but if I were to guess I'd say that there is something unusual happening with the sites certificate. It could be there's an additional OCSP check happening that isn't being displayed on the waterfall, or maybe the SSL negotiation hasn't completed properly and the browser is trying to recover from the error. But given the fact that nothing is happening on either the CPU graph or the bandwidth graph, whatever is happening isn't very work intensive on the device. It is worth noting that the site currently uses an Extended Validation (EV) certificate that Chrome will always conduct an OCSP check on. If anyone has any other ideas about what is happening in this waterfall, I'd love to hear them, so let me know.
Missing component times (DNS, Connect, TLS)
This should no longer be an issue on WebPageTest, but it is worth pointing out if you ever look at waterfall test results from iOS devices pre-iOS 10. iOS versions before 10 didn't report any of the connection component times back to WebPageTest. This was a limitation of what iOS reported through the Safari developer tools interface. Heres a test from 2016 on an iPhone 5c running iOS 9.3:

As you can see the information about DNS, Connect, and SSL are all missing from the waterfall. Note that although not reported individually, the times are included in the TTFB metric so it is still correct. Now compare this to a test run in 2020 on an iPhone 5c running iOS 10.3 (the last version supported on this device):
All iOS devices currently running on WebPageTest report the DNS, Connect, and TLS times correctly. All of them are running iOS >= 10.3. NOTE: There currently (Jan 2020) seems to be a rendering issue on WPT with the iPhone 6 and iPad Mini 2 that was introduced in iOS 12.2, whereby the test is rendered midway through the waterfall chart. But by looking at the two tests listed it is possible to see some component connection information rendered. So at least that isn't broken...
Jan 2021 update: So iOS 14 fixed a few issues with the test runs, but has now introduced more. At the time of this update DNS / Connect / SSL information isn't seen on real or simulated iOS devices for the first connection. But it will be there for later connections. In summary, Safari is a bit of a mess, so you may or may not get connection timing information!
The impact of a CPU bottleneck
This is an old test but it gives you an example as to what can happen once the CPU becomes a bottleneck. You can see the full WebPageTest run here. It is filled with lots of sporadic short bursts of activity across the whole page load. I've focussed on the first 20 requests in the diagram below as the full chart is far too long:
As you can see from the graph, there are multiple TCP connections negotiated in requests 2-5, 8-10. At the same time take a look at the bandwidth graph, it starts to increase then suddenly drops out. If you look at the CPU graph you can see it jump from 10% to 100% in ~200ms at around the same time, then it stays at pretty much 100% for the rest of the page load. This CPU usage is stopping all other process' from doing their work. You can read the full response as to what exactly is happening in this forum post, but a TL;DR is: a combination of multiple SSL negotiations at the same time (they are CPU resource intensive) and heavy CPU usage caused by the parsing of applications JavaScript. Both combined with a testing machine that is underpowered leads to waterfalls that look like the one seen here.
The relevant forum information is quoted below:
The OCSP stapling happens at the CloudFront edge level so every node from an edge location needs to do it. The first request returns immediately a non-stapled answer and the node fires an OCSP request to our CA and then caches the answer which is then used for the subsequent requests hitting that edge node. (The nodes currently don't share these caches, but I filed a feature request so that they try to use a shared storage for that content, like they do for static content.)
During our test we only executed a relatively small number of requests, so we never hit the same edge node twice and that's why it appeared the stapling was broken. When testing you need to fire a few hundreds of requests until consistently getting stapled responses.
As for explaining the rest of the gap from our waterfall graph, we saw that it often happens that the CPU is maxed out while loading our app, for multiple reasons:
sometimes due to multiple SSL connections started at the same time, since they are quite heavy during the negotiation phase while other gaps can be explained due to heavy CPU use during the parsing of Javascript and CSS content (our webapp code is around 400K when minified and compressed)
When these overlap, the gap can grow even up to a few seconds, and it's exacerbated if the testing machine is not powerful enough.
Misconfigured CORS headers
I originlly wrote about this issue in my blog post on the Web Performance Calendar 2020: 'A font-display setting for slow connections'. In the example below a connection is used that is severly limited, only 600 Kbps max bandwidth in.
Fonts on a separate domain require an 'anonymous' CORS connection when being fetched. You can find out more about this font Fetch requirement in the CSS Fonts specification. So when you fonts are served on the other domain, you should also inclide the Access-Control-Allow-Origin header, either set to the origin domain the HTML is served from, or the wildcard value *. This is basically saying that the response (e.g. the font) can be shared with the origin domain.
So what happens if this header isn't set? Well these missing headers trigger the browser to send preflight requests for each of the fonts being served. Preflight requests are very small OPTIONS method requests of approximately 2 KB in size. The preflights allow the server to see details of the font request before it decides if the browser should send the request for the actual fonts. In a case for the fonts the browser is essentially asking the server permission to be allowed to send the actual font requests. These preflight requests can be seen in the waterfall below:

There's a lot going on in the waterfall above, so let's step through it. Requests 15-18 are the preflights sent from the browser to the server. Due to the limited (and maxed out) bandwidth these take 8 seconds to complete. What makes matters worse is there's a whole TCP connection negotiation setup in there too. Only when the browser has received permission back from the server will it send the actual font requests. These then take another 2-3 seconds to completely download. During this time the browser is almost idle, waiting for something to do.
To summarise, misconfigured CORS headers could be effectivly adding a large TTFB to your font requests under certain conditions.
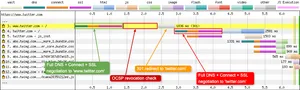
Consequences of a 301 redirect when changing a URL
You sometimes come aross sites that like to either remove the www from the start of their URL, or others like to add it back in. It's easy to spot this on a WebPageTest waterfall chart as it usually happens in the top few requests, highlighted in yellow with a status code after the total time of the request (see the section above 'Request 23 - GIF file moved' for more information). Below you can see the impact this can have on a waterfall chart for Twitter.com. If it is present, Twitter will remove the www from the URL when you hit the site. Both tests were using Chrome on a 4G connection:
With WWW 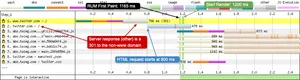
In the above waterfall the user has requested 'https://www.twitter.com'. Request number 1 is the browser requesting 'www.twitter.com', the Twitter server responds back and tells the browser to remove the 'www' and then try again. With the connection already established, the HTML is requested as soon as it recieves the 301 redirect. Notice the times highlighted in the image:
- HTML requested at 800 ms
- RUM First Paint at 1165 ms
- Start Render at 1200 ms
So what does a waterfall look like when a user enters 'https://twitter.com' directly into the browser address bar (or it is auto-completed)?
Without WWW 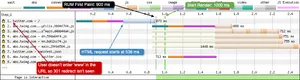
When the user enters the URL that the server agrees not to modify, no 301 redirect can be seen in the waterfall chart. Request number 1 follows the usual connection process (DNS + Connect + SSL). Because there's no wait time for the server to respond with a 301, this has quite an impact on the web performance metrics:
- HTML requested at 536 ms (264 ms quicker)
- RUM First Paint at 900 ms (265 ms quicker)
- Start Render at 1000 ms (200 ms quicker)
It just goes to show, there is a performance impact associated with 301 redirects, so keep that in mind when using them.
The above waterfall charts are testing using a modern browser (Chrome). Let's see what the same waterfall chart looks like in a legacy browser. Things don't look quite as performant:
Here we see IE10 on a 4G connection. There's a whole bunch going on with request number 3. First we have a full connection negotiation (DNS + Connect + SSL), then we have a pause for the OCSP revocation check (requests 1 & 2), the browser then waits for a response back from the server to remove the 'www'. Then quite unexpectedly (to me) it does another full connection negotiation, this time to 'https://twitter.com'! The browser seems to see 'www.twitter.com' and 'twitter.com' as totally different websites. Not very optimal for web performance. Thankfully IE10 usage is now pretty much non-existant and the issue looks to have been fixed in IE11!
The missing intermediate certificate
How can you tell when one of your intermediate certificates from your Chain of Trust is missing? Well, assuming your SSL certificate contains Authority Information Access (AIA) information, you will be able to tell from a waterfall chart:
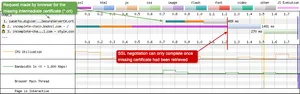
Usually you would host the intermediate certificate along with your leaf certificate. But if for some reason you forget, the browser will attempt to retrieve the missing certificate from the information provided in the sites leaf certificate. As you might expect this isn't great for security or web performance. If the certificate can't be retrieved, then the browser may need to 'soft-fail' and just assume that the leaf certificate is legitimate. Also, while the intermediate certificate is being retrieved (a process that is synchronous and blocking) the SSL negotiation can't complete. During this period the user sees a blank page. So remember, always check that your sites certificate chain is complete using a tool like SSLLabs. If you want to know more about certificate revocation in browsers, I've written a blog post here that you may find interesting.
A vary unusual waterfall (empty gaps between download data)
This was such an interesting and frustraiting issue, I've actually written a blog post all about it which you can find here. But a TL;DR; version is: notice how the requests 6 and 7 have a weird set of gaps between the data chunks:

Esentially what is happening is the browser is recieving data from a CDN that has been poisoned (it is missing the CORS headers needed for the font fetch). Lets step through the waterfall:
- First the WOFF2 font files are requested by the browser after a new TCP connection is established
- A very thin slither of data is received (most likely the headers)
- The browser immediately cancels the request as there are no required CORS headers. This explains the 'empty space' between the data.
- The browser immediately requests the next fonts in the
@font-facedeclaration (requests 8 & 9) - The browser still receives chunks of WOFF2 data because this data was already in transit over the network or sitting in one of many buffers along the way.
And what's the solution to this issue? Make sure you are serving vary: Origin along with your font responses. Simple fix when you know that huh!
Examining undefined 204 status codes
In this chart we see multiple requests going out to the server, but as you can see the responses back are quite unusual. The colours for requests 14, 16-21 are all grey indicating they are of the type 'other'. Clicking on each of the requests shows Error/Status Code: 204 and the bytes coming in were 0. Looking up the status code 204 details, that makes sense. Status code 204 indicates that there's no content. The request has been successfully completed by the server and there's no aditional content to send in the response payload body. In fact if you read the specification a 204 response cannot have a response body. The response terminates once the first empty line is recieved after the headers.
So what's happening here? In hindsight, once you know the answer it's quite obvious, but very few clues are actually given in the waterfall responses, so it can be very frustraiting to debug. Examining the 'start' and 'end' responses that are top and bottom of the 'undefined' responses, shows the browser requesting icons and the server is responding accordingly. But the icons being requested between the successful responses are coming back as 'undefined', as it could be that the icons don't exist on the server. Now I have struggled to reproduce this waterfall in my own tests. I can get a 404 response by removing an icons src key in the manifest.json file, and a 304 response by setting the src to "" or "/". But a 204 is something I haven't managed. So why exactly this particular server setup responded with a 204 rather than a 404 is a mystery to me. Any thoughts or ideas please do tweet me!
So if you see this pattern in one of your waterfalls make sure your icons are all referenced correctly and exist on the server.
Service Worker precache slowing a page load
Sometimes a Service Worker can impact a pages web performance and actually make it slower. Service workers have the ability to precache assets to make future navigations more performant, or allow a website to work offline. But you need to be careful where this precaching occurs in the standard page load process. In the waterfall below we can see the service worker registering too soon and instructing the browser to load additional assets into the Cache API. This is a different cache compared to the standard HTTP Cache.
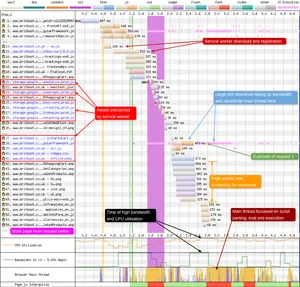
Lets step through these requests as there's a lot going on in this waterfall:
- Requests 1-13 are initialised by the main HTML page (text in black).
- Requests 14-15 are downloading the pages service worker (text in blue). Once registered, the service worker queue's up additional assets to be downloaded (21, 23, 25-28, 37-41).
- Notice how request 38 is downloading at the same time as the original page assets in requests 42-49. These assets are now competing for the limited device resources.
- Between 2.4 - 2.6 seconds the device is both CPU and bandwidth limited. The script from row 38 is causing huge amounts of script execution, as seen in the 'Browser Main Thread' graph at the bottom.
- Notice how request 3 and request 38 have identical filenames and similar JavaScript execution patterns. This is the same file being downloaded once into the HTTP Cache and then again into the Cache API.
- There are even more request rows after 54, so even at this point the page has yet to complete loading.
The fact that the pages service worker has fired too early has caused the browser to reprioritise its asset download queue in such a way that it will slow down a page load due to limited bandwidth and CPU time. The service worker assets are stealing resources from page assets before the page has finished downloading!
So what's the fix for this issue? Well it's actually quite simple and is mentioned in this service worker registration primer. Wrap your service worker registration code in an event listener and delay registration until after the pages load event fires. This delay allows the pages assets to download, which should allow the page to (hopefully) render quickly for a user. At this point the user can start interacting with the page and the service worker can register and precache any assets in the background.
if ('serviceWorker' in navigator) {
  window.addEventListener('load', function() {
    navigator.serviceWorker.register('/service-worker.js');
  });
}
In regards to the repeated download into two sets of caches (request 3 and request 38), if you are using Workbox, check out the ignoreURLParametersMatching setting on this page. The option lets you configure a pattern for hashed files that can safely be served from the HTTP cache (if present), which lets you avoid double-downloading them. Thanks Jeff Posnick for the tip!
Credit for bringing this waterfall to my attention goes to Andy Davies, who recently spoke about this issue. Slides for his talk can be seen here (slide 50 to 62). I hear there's a whole blog post all about this issue in the works too, so watch out for that.
HTTP/1.1 and the Connection: close header
When is HTTP/1.1 actually HTTP/1.0? Answer: When you use it in conjunction with the Connection: close response header. One of the major features added to HTTP/1.0 was the ability to persist connections across asset downloads. Under HTTP/1.0 an asset would download then at completion the TCP connection would be closed. At this point a whole new TCP connection would need to be negotiated before the next asset could be downloaded. What a waste of resources for both client and server! TCP connections are expensive! Lets look for the tell-tail signs of this configuration in a waterfall chart:
HTTP/1.1 + Connection: close
In the example waterfall above we see a total of 10 requests over a HTTP/1.1 connection, but almost every one of these requires its own brand new TCP connection. NOTE: The fonts were on a separate domain with HTTP/2 enabled, hence a persistant connection across 2 fonts. Now this example is from a really simple site with a small number of page assets. Imagine if a page load required 74 requests. Why 74? Well that's what the median web page requires in the 2019 Web Almanac. Under these conditions you'd have 74 TCP connection negotiations! Each of those includes multiple RTT's for the connection and TLS negotiations. That's a lot of wasted network packets and CPU time on the device and server.
HTTP/1.1 + Connection: keep-alive
Now if you compare the first waterfall to the one above. It's the exact same page only with the Connection: keep-alive response header used instead. Here you can see the persistant TCP connections have done their job. Multiple requests coming down the same connection (one after the other) so only 4 are required. 2 of those TCP connections seen are for the font requests which are on a separate domain. So it's actually only 2 TCP connections working in parallel that are required to download all the other page assets.
Note that the default behavior for HTTP/1.1 is to have persistant connections enabled, so something has to actively add the Connection: close response header for the above scenario to happen at all. I actually have a separate blog post all about this scenario for those who are interested in finding out more information.
Content autofill on mobile devices
Here's a single request that I bumped into by chance after conducting some mobile testing using the default Chrome browser on the Moto G4 devices that sit in Pat's basement in Dulles. On request 23 you will see a request that goes out to content-autofill.googleapis.com.
So what is this request? Well Autofill is functionality that has been in Chrome since mid-2015. It's there to make filling in forms easier on mobile devices. Chrome will fire off a request to the Google servers and request relevant information needed in the form that is stored in a users Google Play Store account. Depending on the page markup, the browser can then autofill this information for the user, meaning less typing and quicker purchases.
It's worth noting, from the waterfall you can see that this functionality has been built to have no impact on a web pages performance. The request is only 'created' after the DOM Content Loaded event fires (which makes sense as the browser will need to know if a form element exists on the page). The actual connection to the Google Servers only starts at the time the the Document Complete (onload) event fires. An observant reader may also notice that there's no DNS lookup time for this connection, even though it is to a third-party. My guess here is that the device has the IP address for this domain already stored internally, so there's no need for it to be looked up by the browser.
Identifying a Cross-Origin Resource Sharing (CORS) connection
So if there's one thing we can probably all agree on it's that literally nobody understands CORS. Given that, at some point while examining a waterfall chart you may want to know when a CORS connection is being used. So how would you go about this in WebPageTest? The first thing you can examine is the sec-fetch-mode HTTP Request Header, which you can find under the 'Request' tab when you click on an individual request as seen below:
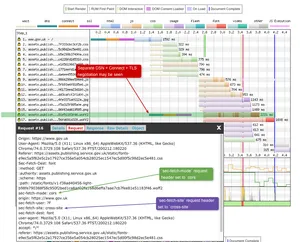
If sec-fetch-mode: cors is seen this may indicate a CORS connection is being used. There's also the sec-fetch-site: cross-site header which also indicates that this may be a CORS connection. This header (that the browser sets) is telling the server hosting the font to handle this request as a cross-site request, so handle it with care (due to possible security concerns). Notice how I have also highlighted the separate TCP connection that is being negotiated for this request. This could also be an indicator that a CORS connection is being used (but not always).
Again using GOV.UK as an example but with the font now hosted on the same domain as the origin using HTTP/2, no separate TCP connection is seen but sec-fetch-mode: cors is still set.
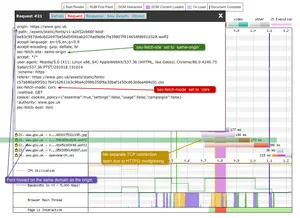
In the above example we know for sure that this asset is being downloaded using CORS because it is a requirement when fetching fonts that is defined in the CSS Fonts Module Level 3 specification. The key difference here is the sec-fetch-site request header. Instead of the browser attaching a cross-site value, it is attaching a same-origin value. So although it is listed as a CORS connection according to sec-fetch-mode, it isn't actually being requested across origins (since it is same-origin), so basically ignore CORS and download it anyway.
So is sec-fetch-mode: cors a reliable way to see if CORS connection is being used? I'm afraid not. This header comes with a couple of issues:
- In Chrome the Fetch Metadata feature is still in development with a ticket from 2018 still open. So it can sometimes be wrong.
- Browser support isn't great, with Safari (iOS and MacOS) and Firefox notable browsers that don't support it.
So on it's own it can be an indicator of a CORS connection, but it's not 100% reliable. Given that another strategy would be to examine the WebPageTest connection view. Within this view if you happen to see that you have over 6 connections to the same domain on HTTP/1.1, or more than 1 on HTTP/2, there's a high chance that one of these connections will be CORS. For more information on how to read a connection view chart, check out my blog post here.
Identifying a CORS preflight request
Related to CORS there is a concept known as a 'preflight request'. Some CORS requests don't trigger a preflight request. These are called 'simple requests'. If a request meets all of these conditions then it is considered 'simple' and a preflight isn't required.
If a CORS request doesn't meet all the conditions from here, then it will require a preflight request. I like to think of a preflight request as if you were to contact an online retailer to see if they have something in stock before you go ahead and order it online. The preflight request is checking with the server to understand if the actual request is safe to send back to the client (e.g. checking the Access-Control-Allow-* header values the server supports). These preflight requests are sent using the OPTIONS method (e.g. allow the client to understand what communication options are available from the server). The response from the server isn't cachable and may not contain a response body (it will set the Content-Length: 0 header when this is the case).
It is possible to identify these preflight requests in WebPageTest:

The above request didn't meet the conditions set out here since it is asking to use the DELETE method. So the rquest isn't classed as 'simple' so the browser needs to check with the server to see if it supports DELETE.
If you are looking for examples of where CORS requests are triggered, this is an excellent site which includes if a 'preflight' is required too.
Eager prefetches
HTTP/2 prioritisation is incredibly important if you want pages to load optimally. Unfortunatly there are very few CDN's and cloud hosting providers that do it well. This is especially important when a browser is loading assets for the next navigation in order to speed up a users journey once the current page has loaded. If done badly this pre-emptive loading can actually impact on the current page loading:
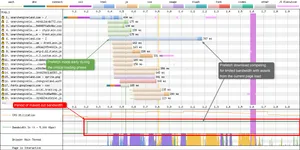
In the above image (using Chrome) we see the the <link rel="next" href="https://example.com/page/2" /> in the page head triggering a prefetch. This prefetch isn't a mistake, it's actually in the HTML Living Standard document. But what should be considered a mistake is where it is taking place during the page load. It's way too eager. But it's actually worse than a single request to a HTML page. Looking further down the waterfall we can see this isn't just a prefetch. It's actually a prerender. And as I mentioned earlier in this post a prerender will also parse the HTML and load the assets from the page listed in the rel="next" link tag. This can be seen in the following waterfall:
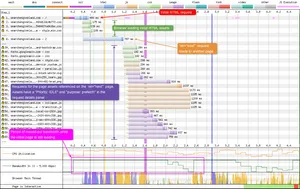
The critical point is that these requests are being made for the 'next' page while the current page is still loading. So what happens if a user never actually navigates to this page? Well, that means the current page performance (and a users data) has been impacted for no reason. If these requests were made once the network were idle (i.e. the initial page has loaded), then this could be a useful feature.
It isn't only Chrome that does this, Safari does too, which Andy Davies discusses in his 'Rel=prefetch and the Importance of Effective HTTP/2 Prioritisation' blog post. Chrome 88 due for release very soon (at the time of writing) actually fixes this issue.
One last point on this functionality: it's currently considered good practice to include rel="next" and rel="prev" links in pagination pages for SEO purposes. It's certainly worth considering & testing the web performance impact of these before adding them to your page.
The performance impact of @font-face source failures
Below you can see the annotated waterfall for a site that requests the WOFF2 font first but it fails. This test was run on a real Moto G4 / 3G Fast connection:
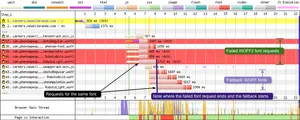
There's a fair amount going on in this waterfall so let's step through it:
- On request 37 we see the TCP negotiation happen for the font domain. Once completed the font request goes out for the WOFF2 font. This whole process takes 2 seconds to complete. It takes ~865 ms to fail. That includes a full round trip to the server and back.
- On request 41 it takes a full 1.7 seconds to fail. Notice how once failed the browser almost immediately requests the fallback WOFF font (request 46).
- Notice how this fail / request pattern for all 4 fonts are aligned. Requests 37 & 43, 39 & 45, 40 & 44, and 41 & 46 are all font pairings (WOFF2 vs WOFF).
So in other words, the browser must receive a font failure before it can request the fallback. This lack of primary font source is adding 2 seconds to the font load in this test case. What's worse in the test case above is that the browser ends up downloading the larger of the two font file types. Since WOFF files can be 20-30% larger than WOFF2 files. Ultimately the user gets a double whammy in terms of poor performance: added time to make a successful font request, and more data to download.
So how can you check for this? Well, I'd look to the browser console. If you notice 404 errors for fonts, I'd put those errors pretty high up your prioritisation list to fix!
This scenario has been copied from my blog post 'The importance of @font-face source order when used with preload' if you would like the full context of this issue.
Double font downloads when using the preload resource hint
In the below waterfall chart we see a huge number of font downloads. The reason why this is, is quite interesting:
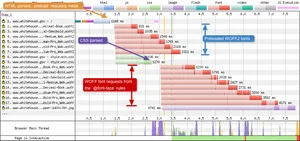
Notice how the font requests from 2-7 are directly after the HTML download and parse. This is a sure sign that the preload resource hint is being used. Then further down the the waterfall we can see the CSS being downloaded and parsed (request 9). The result of this CSS parsing are font requests 10-17. The unusual thing about this is that the font preload is supposed to stop (or at least minimise) font requests happening at this point. By preloading the fonts they are already in the browser cache, ready to be used when needed. So it turns out the issue here is that the source (src) order in the @font-face rules are incorrect for this page:
@font-face {
  font-family: bodytext;
  src: url(our-test-font.woff) format("woff"), /* WOFF tried first */
  		url(our-test-font.woff2) format("woff2"), /* If WOFF is successful, WOFF2 is ignored */
       url(our-test-font.ttf) format("opentype"); /* TTF tried if other not supported. */
}
With the WOFF fonts placed first, a browser that supports this format will always download them and ignore the WOFF2 versions. But the preloads above are for WOFF2 fonts. This mismatch with the preload and the source order in the @font-face causes both types of file to download for any browser that supports WOFF2 (and that's quite a few!). In order to fix this issue make sure your preload font files match the src order in your @font-face rules.
This scenario is a very condensed version of my 'The importance of @font-face source order when used with preload' blog post. If you want to find out more about this issue I recommend reading it.
SVG's opening up a new TCP connection
Here's something I recently learned while running a site through WebPageTest. I just happened to see that SVG images were forcing the browser to open a new TCP connection when they were being downloaded from another origin:
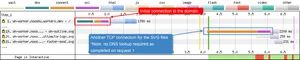
On request 19 you can see an additional TCP connection being opened for the SVG files. Notice how a DNS lookup isn't required. This is because it has already been done on request number 1. So this is a clear indication that this is an anonymous connection (since HTTP/2 is being used on this domain). Now this isn't a bug in the browser or WebPageTest. This is all expected behavior and is actually defined in the SVG specifications:
[In relation to SVG files] When fetching external resources from the Internet, user agents must use a potentially CORS-enabled request as defined in HTML [HTML] with the corsAttributeState...
In most cases when you are downloading resources from different servers the cross-origin protection isn't required, e.g. images, CSS files. Since CORS is a security feature put in place to control if the host site can access the information within the linked file being requested (the SVG file in this case), you may be asking why this is the case for an image file format. Well it turns out that SVG is capable of doing a lot more than being a simple image format, for example you can embed scripts for animation. These scripts can interact with the a document (on the remote server), and it is difficult to shild from this. So in theory an SVG can be customised to include private data about the remote server (which the page downloading the SVG shouldn't have access too). Because of this, an SVG is required to be loaded over a CORS-enabled TCP request when being loaded cross-origin. There's a whole section in the O'Reilly Using SVG book all about this.
So if you ever see a browser opening up new TCP connections for SVG files, now you know why.
More to be added soon...
As I discover more common waterfall scenarios I will add them here. If you know of any common ones that are missing, please do let me know!
Hidden gems
So there are features that are hidden in plain sight on the WebPageTest UI that you may not have even noticed before. Here are a few that I've found useful:
How the filmstrip view and waterfall chart are related
Now it may seem obvious to some, but it is worth pointing out nonetheless. There is a direct relationship between the filmstrip view and the corresponding waterfall chart below it:
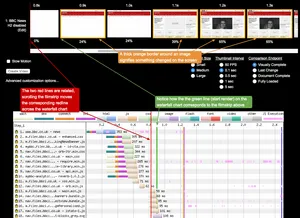
To the far left of the filmstrip you will see a 1px vertical red line. As you scroll the filmstrip horizontally you will see an identical red line moving across the waterfall chart. These are directly related. Together they show you what the page looked like at that exact point in the waterfall chart (you would not believe how long it took me to notice this feature!).
Another feature that can be seen is the use of a thick orange border around some of the images. This orange border signifies that something has changed on the screen (compared to the previous one). This is very useful if you are trying to identify even minor changes between screenshots (like an icon loading).
You can see both of these features in action in the screenshot. There is a thick orange border around the image at 0.9s, as it shows a major change to the page compared to the image at 0.8s. Looking closer at the waterfall we can see the red line is approaching and the vertical green line (start render). The image at 0.9s is actually the start render time for the page.
Update to filmstrip thumbnail size You may have noticed in the filmstrip image above that there's an option in there to control the thumbnail size of the filmstrip images (small, medium, large). Now this doesn't only control the image as it is seen on your screen, if you decide to export the filmstrip the output image will also be effected. Previously the method for increasing the size of these imaes was to use the thumbSize URL parameter to a bigger value (it maxed out at 500px).
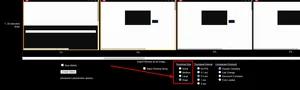
Recently a new option has been added, and that is the 'Huge' size (see above). By default selecting this option will return the native size captured by the video. But if you have 'Capture Full Size Video' enabled then each of the thumbnail images will be 600px wide.
What do the filmstrip thumbnail border colours signify
Over the past month or so (May/June 2020) there's been an important development for web performance on the web. From 2021, Google will start evaluating page expereince and will include the results in how a page is raked by the search engine. They will be evaluating a pages usability using three metrics (at the time of writing). Together they are known as the 'core web vitals':
- Largest Contentful Paint (LCP) - Measures loading
- First Input Delay (FID) - Measures interactivity
- Cumulative Layout Shift (CLS) - Measures visual stabiliy
You will be excited to hear LCP and CLS are now very easy to spot on the filmstrip view, thanks to Rick Viscomi who raised this issue and of course Pat Meenan who implimented it. A key of what each of the borders means can be seen below:
- No border: no visual change occurred.
- Yellow border: a visual change occured on this frame.
- Red border: Largest Contentful Paint (LCP) occured on this frame.
- Yellow/black dashed border: There was a visual change and a layout shift on this frame.
- Red/black dashed border: Largest Contentful Paint (LCP) and a layout shift occured on this frame.
Or if you prefer, an annotated filmstrip with all border variations can be seen below, generated from this comparison view.
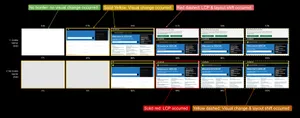
How to generate customised waterfall chart images
Almost all of the waterfall images in the article you see above have used this feature that is tucked away at the bottom of every waterfall chart. WebPageTest gives you the ability to customise what is included in a waterfall chart:
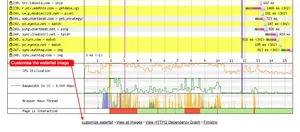
Clicking the 'customize waterfall' link directs you to a set of customisation options (see image below):
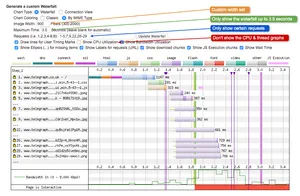
As you can see in the image above, I have customised the output image. We have:
- Set a custom image width
- Set a custom time that the whole waterfall chart covers (note this will lead to cropping of requests further down the waterfall)
- Only selected certain requests to be shown either individually or as a range (notice the ellipsis between these that identify missing items)
- Unchecked 'Show CPU Utilization' so the 'CPU Utilisation' and 'Browser main thread' graphs are hidden
All these options allow you to remove much of the noise in the chart so you can focus on the areas you wish to identify and highlight. Once you are happy with the image, simply right click and save the image to your device as you would any other image.
How to examine detailed information about images on a page
Here's another one of those links that is sitting in plain sight below the waterfall chart, the 'View all images' link. It doesn't sound very useful but once you understand how it works you may reconsider that.
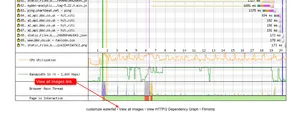
Once you click on this link you'll be presented with a full page of images that were loaded in the test by the browser. A couple of key points to mention:
- The images a presented in the order in which they were loaded by the browser. This is really useful to spot-check images sizes and the load order.
- WebPageTest doesn't store these images, they are loaded from the original server. This is important to remember, as for older tests these images could break if they are removed from the origin server.
For each of the images you are presented with the following information:
- Image URL
- Filesize
- Image content type
And if the image happens to be a JPEG, you will also get the following extra information:
- Optimized size including new size and the difference in KB (only seen if image can be optimised)
- JPEG scan count [1 scan = 'Baseline (Renders top-down)', multiple scans = 'Progressive (Renders blurry to sharp)']
- Analyze JPEG link
Analyze JPEG Here's a hidden easter egg for you within the 'View all images' page. Each of the JPEG images can be analysed further by clicking the 'Analyze JPEG' link. This takes you to a page with a whole wealth of further information about that specific image:
- Image statistics
- Original image
- Optimised image using lossless compression
- Optimised image using lossy compression (at 85%)
- Exif data found in the image
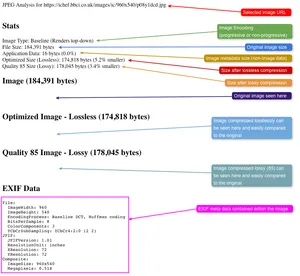
This information is all fairly self-explanatory. But there is one point worth noting: 'Application Data' is referring to the size of non-image data (metadata) that is embedded within the image file (in a binary format). This can quite often be large if it hasn't been stripped out. Examining the IPTC Photo Metadata Standard 2019.1 metadata schema it is easy to see why. There are a huge number of fields that are valid, and each could potentially contain data. So if you are looking optimise an image down to the very last byte you should strip out this data.
How to inspect the 'Browser Main Thread' - Part 1
Only for tests using a Chromium-based browser.
The 'Summary' page for the tests that have run you will see a link that says 'Timeline (view)' It's fairly inconspicuious so you may not have noticed it before:
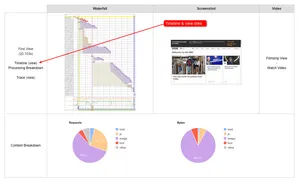
It turns out that this link is actually 2 links:
- 'Timeline' - downloads a JSON file with all the data
- '(view)' - opens a version of Chrome inspector for the data
I will be concentraiting on the '(view)' link functionality for the rest of this section.
As mentioned in the Browser Main Thread section above, the colourful graph at the bottom of a waterfall chart tells you what the browsers main thread is doing at any point in time. Ranging from 0-100% for 'Script parsing, evaluation and execution', 'Layout', 'Painting', 'HTML parsing', and 'processing not accounted for'. The great thing about this small graph is it gives you an indication of where the bottlenecks are in your website. For example, if this graph is solid orange, the device is parsing and executing JavaScript and is likely being limited by the sheer amount of it (or horribly unoptimised code!).

In the example above we see two main areas of heavy activity on the browser main thread. We can understand some of what is happening because of the colours used in the graph and the height on the graph, but we have no idea exactly what is causing this heavy activity. This is where the '(view)' link comes in incredibly useful:
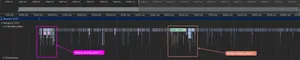
If you've ever used the 'Performance' tab in Google Chrome the above image will look very familiar. It is esentially a slightly cut down version of that tab (in terms of data available). Clicking on the link opens up a whole wealth of information related to browser main thread (CrRenderMain), giving you the ability to see what caused all the activity on the thread (for the test that ran). Above I've drilled down into the main thread data. You will see a striking similarity with the graph at the bottom of the waterfall chart, and that's because this data is what drives the waterfall chart visualisation. Both heavy activity points have been highlighted as an example. This activity is made up of hundreds of thin slices of colour, each one signifying an event that happened on the main thread. You now have the ability to zoom in and click on each one of these slices to find out more information about what is happening. For lots more information on the performance tab in Chrome DevTools check out Get Started With Analyzing Runtime Performance by Kayce Basques.
How to inspect the 'Browser Main Thread' - Part 2
Only for tests using a Chromium-based browser.
Note: I recommend reading Part 1 above before reading this section, as I reference parts of it below.
On the 'Summary' page there's a link that sits to the left of the waterfall thubmnail. This time it is called 'Trace (view)':
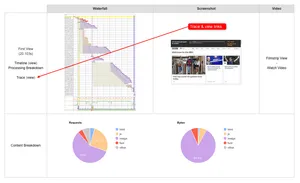
Again, what looks like a single link is actually 2 separate links:
- 'Trace' - downloads a JSON file with all the data
- '(view)' - opens a tool called Perfetto that allows you to inspect the data
I will again be concentrating on the '(view)' link functionality for the rest of this section.
When you click on the '(view)' link it opens up a whole new window that looks nothing like WebPageTest:
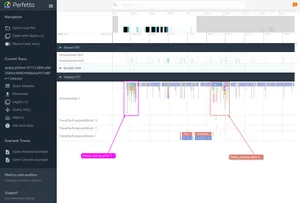
Now what you may be thinking is: "Well this looks very similar to Chrome inspector mentioned in part 1". And you would be correct. The same underlying data is the same in both tools. It's just the UI's that are different. I've even highlighted the heavy activity points as seen earlier so you can see the similarities.
So what's the point in having 2 different tools displaying the exact same data? Well the simple answer is that Perfetto is capable of displaying a lot more data than what you see in a default WebPageTest run. In a standard WebPageTest run, the data being captured is primarily focused on the browsers interaction with the website in question. Things like assets downloaded, times taken to parse scripts, how the page actually rendered etc. In these tests we aren't concerned with how well the (Chromium) browser itself performed at a system level. Chrome comes bundled with functionality that allows developers to capture the underlying interactions at a system level and profile the Chrome browser itself. This is called chrome://tracing. Perfetto is WebPageTest's new replacement for chrome://tracing. So given the opportunity, WebPageTest is able to provide you with a lot(!) more system level data. Data like GPU, Compositor, and Network service information. To capture this data simply enable the 'Capture Chrome Trace (about://tracing)' option under the 'Advanced settings' --> 'Chromium' tab when you are setting up your test.
Warning: If you are only interested in web side of the WebPageTest data, DON'T enable this option. Some categories can add a lot of overhead to the tests, which in turn can result in the skewing of overall timings. This setting is primarily targeted at browser engineers, not web developers. For those of you curious about the data you get back, see the image below. When I tested with tracing enabled, WebPageTest generated a 20MB JSON file just for the trace data!

As you can see, it's all very colourful but very much data overkill for page level performance testing!
How to analyse page images for optimal compression and render size
Optimally sizing and compressing images on the web is a difficult problem. There are so many different loading methods and formats available, so how do you choose which format is best to use? Well thankfully WebPageTest comes with a handy link to a tool that will massively simplify this process. The tool is provided by Cloudinary, who are a platform that offer products that automate the optimal delivery of media assets. For every WebPageTest run, it is possible to analyse the images loaded in the test by clicking on the 'Image Analysis' link in the test result navigation:
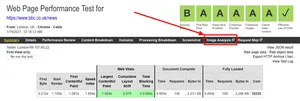
This link isn't the only way to get to the tool. If you know the ID of the WebPageTest result then simply navigate to:
http://webspeedtest.cloudinary.com/results/[WPT_TEST_ID_HERE]
Cloudinary will extract the information it needs via the WebPageTest API for your test ID. This pattern could be useful if you are generating these links programatically, for example via WPT-Bulk-Tester.
Once you navigate to the tool and it has analised the test results, you will be presented with an overall page score as well as the potential image sizes on the page after optimal compression:
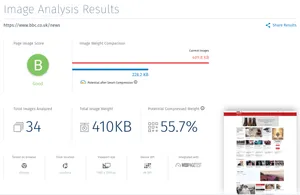
If you scroll down the page the tool will even give you a score from A-F for every image listed in the test, and the size of each image once transcoded to a different image format. By default it tries JPEG, WebP, JPEG-XR, and PNG. Thus allowing you to decide which format is the best for the individual image at hand.
Important note: This tool will only analise the images that are listed in the WebPageTest results. So for example, if you are testing using Chrome and the page images have native lazy-loading attribute (loading="lazy"), only the images that Chrome decides to lazy-load will be analysed.
How to visualise the requests from your test
I'm not sure if this is classed as a 'hidden gem', it's actually quite prominant being in the secondary navigation for all test results. But I'm going to list it anyway:

The request map tool is a great way to visualise all the requests that happened in a WebPageTest test, allowing you to quickly see all the domains that were visited, files downloaded, relative size of the asset transmitted in bytes, as well as many other bits of useful functionality. Once you understand what it is displaying, it becomes an extremly powerful tool for understanding how a website is built, as well as general debugging. Here's an example request map from everyones favorite web performance poster child: CNN:
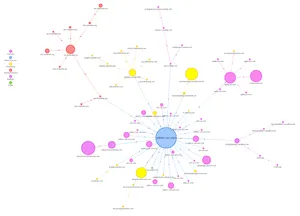
It was created by Simon Hearne. You can see a live demo here, and read all about it on Simon's blog here.
How to visualise variance in metrics across multiple tests
What if I told you there was a way to graph the variance in metrics across test runs in WebPageTest. Until today I had no idea it was possible. There are a few quirks to how this functionality works, but it is possible to get it working. First you must have a test which completed more than one run (you need some variance in the stats after all!). Historically this functionality has been used to plot variance within tests that have 100+ test runs. Within the test summary you should see the 'Plot Full Results' link sitting below the 'Performance Results' table (see image below):
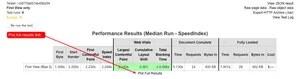
Clicking the 'Plot Full Results' link will initially bring you to a very empty looking page. The reason for this is because you currently only have a single test ID in the urls tests parameter. Here's a quick way to generate multiple test ID's in a url:
- Go to the 'Test History' (top navigation)
- Select the tests you wish to compare (checkbox's along the far left)
- Click 'Compare' button at the top of the page
- Copy the long
testsparameter in the URL with all your selected test ID's - Add these to the
https://www.webpagetest.org/graph_page_data.php?tests=[ID HERE],[ID HERE]...url then navigate to the page
Now you will be presented with approximatly 27 graphs, one for each of the major metrics:
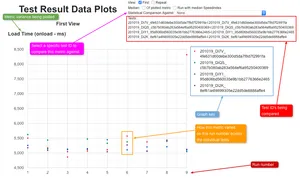
The graph quickly gives you a sense of how stable a metric is across test runs, and allows you to spot outliers easily. There are quite a few other settings you can play with too. I recommend changing the 'Statistical Comparison Against' dropdown to one of the test ID's. This will then give you a whole set of tables where you can see how the other tests varied compared to the selected test ID. If you are interested in statistics related to web performance metrics, you will enjoy this hidden page on WebPageTest.
How to add custom marks using the User Timing API
Here's a useful feature you may not know about. Using the User Timing API you have the ability to mark certain points in your page load. These points will be discovered by WebPageTest and displayed accordingly in the results.
For example, if you wanted to know when the browser got to the end of the <head> tag, you could add the following code right before the closing tag:
<head>
<!-- head stuff here... -->
<script>window.performance.mark('mark_head_parsed');</script>
</head>
The browser then sets a mark at this point which can be read by WebPageTest. The resulting WebPageTest run will show you results similar to this:

As you can see from the image above I have set four User Timing marks on the page and one of them is called mark_head_parsed. You can add as many marks as you need, it really depends on what you are trying to measure. Now if you head over to the 'customise waterfall' link (as mentioned in the section above), you will see one or more purple triangles and vertical lines on the waterfall chart. These are the User Timing marks we just set:
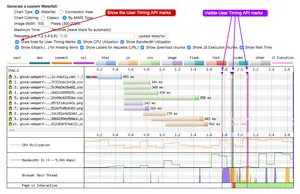
In the image above the timing marks are now visible (you get the option to toggle them on and off if required). So you may be thinking: "So why can't I see these marks on the interactive waterfall chart?". The reason for this is because they have been disabled by default on the interactive chart. Many third-party JavaScript scripts were including marks in their code, which was polluting the graph with a whole load of noise that were irrelevant to most WebPageTest users. So it was decided to disable the visibility of the marks by default. Marks can now only be seen within the 'customise waterfall' link.
Note: If you happen to be running a private instance of WebPageTest, you can configure it to display the User Timing marks to be on by default for the interactive waterfall chart.
How to display the bandwidth graph on mobile devices
When you run a test on one of the real mobile devices that are sitting in Pat Meenan's basement in Dulles, VA, by default you don't get a bandwidth chart like you do on desktop agents. Resulting in an output that looks like this:
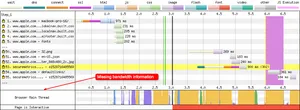
If you do want to capture this data and display the graph in the resulting test, make sure you check 'Capture network packet trace (tcpdump)' under the 'Advanced' when you configure your test:
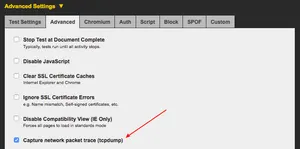
This will give you a slightly different version of the 'Bandwidth In' graph than you see on desktop agents:
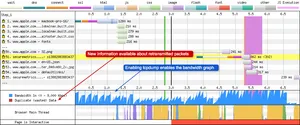
It now gives you information about the data wasted due to the retransmission of packets over the network (although not actually seen on the example graph). An example with 'Duplicate (wasted) Data' can be seen here along with a little more information.
How to test a 404 pages web performance
So I had a weird usecase for wanting this feature in WebPageTest releated to one of the GOV.UK applications, so there may be others out there wondering about their 404 page performance (right?). So it seems like a 'feature' worth documenting. Keep in mind that many automated testing tools will simply abort a test should you happen to run one on a 404 page This makes sense after all as the tool is encountering a 404 status code, why would it continue?
But my thoughts on this are: should your user mistype a single charecter in a URL, they are likely going to be hitting your 404 page. What if you happen to have some strange server / templating configuration for the 404 page that is serving a large amount of data. It could even just be just a large image on the page. Do you really want your users to be wasting their time and bandwidth on a page they don't even want to be on? A secondary point is that a 404 request will be hitting your origin server too (including the servers hard drive), so you want it performing optimally. And remember to 'Make sure you have a favicon', else there will be a lot of hits to your 404 page! I've now written a blog post all about 404 performance testing which you can read here.
There is now a workaround in WebPageTest that allows you to do this, either via the user interface, or WPT scripting:
User Interface
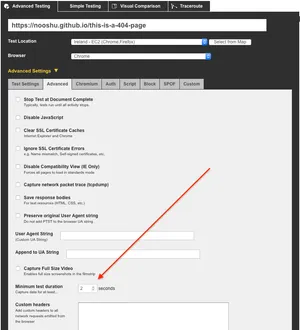
Scripting
setMinimumStepSeconds 2
navigate https://www.example.com/this-is-a-404-page
Simply set a minimum test duration of a number of seconds longer than the 404 page takes to load to gather metrics about your 404 page performance.
How to delve into the download chunk data
I mentioned the fact that download chunks are visible in each row, and they are identified by the darker colour in the Download chunks section before. But lets say you wanted to find out a little more about these chunks. Simply click on the request row you want to find out more about then click on the 'Raw Details' tab. Scrolling down a little in the box you will find a 'chunks' key within the JSON data. The 'chunks' key has an array as a value, and within the array there are separate objects each with information about a single chunk of data.
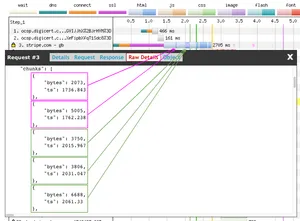
Each chunk object has two keys:
ts: stands for timestamp. It's the point at which this download chunk completed (not started). The time is in milliseconds and relative to the start of the waterfallbytes: pretty self-explanitory, the number of bytes that were downloaded in this chunk.
WebPageTest works backwards from the completed chunk timestamp, looking at the bandwidth available at that point in time and calculates how long it would take to download that number of bytes. This gives a chunk its width on the waterfall. This is all measured from Packet Capture (pcap) bandwidth information.
Multiple chunks in very close proximity merge together to look like a single large chunk, but this data allows you to drill down into each large chunk to see the individual chunks.
How to view a sites HTTP/2 dependency graph (Chrome)
So HTTP resource prioritisation is a notoriously complex beast of a problem (that's an understaitment!). Don't believe me? Here's Robin Marx giving a 35 minute talk all about it at FOSDEM 2019. Now what you may not realise is that if a website is using HTTP/2 and you run it through WebPageTest, there is a way to quickly view the HTTP/2 dependency graph for the particular browser used in the test:
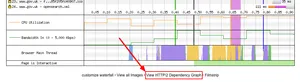
I'm not going to go massively into the details of what is involved in prioritisation, there are plenty of books, blog posts and talks online from folks who know much more about it than I do. But I will try to give a brief overview of how to read a basic chart. It's worth noting that each browser does this differently:
- Legacy Edge and Internet Explorer don't support prioritisation (they load everything split equally in parallel)
- Safari loads all resources in parallel, but splitting available bandwidth depending on the priority as Safari sees it
- Firefox builds a complex dependency tree and loads resources according to it
- Chrome (and all Chromium-based browsers) construct a linear list and loads according to that list
There's an excellent blog post here from Pat Meenan looking at the impact this prioritisation can have on actual user percieved performance. For the annotated dependency graph below I've choosen the Chrome browser and the website GOV.UK as a test subject, since I know it now runs on HTTP/2.
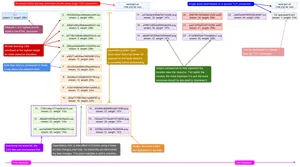
This is quite a busy looking diagram so I will pull out a few features:
- Each of the boxes corresponds to an individual resource, and the colour of the box corresponds with the key colours defined above the WPT waterfall chart
- Top left of each box is a number that corresponds to the request number in the waterfall chart
- Each resource is weighted by Chrome. The higher the number, the more important Chrome regards it
- Multiple 'trees' indicate multiple TCP connections used to download a sites resources
- Resources on the left are requested first, moving across to the right for later requests
- Resources from top to bottom indicate the dependencies. A file lower down the list depends on those above before downloading
Where you see a 'fork' in the tree (after request 10), this is Chrome shifting priorities as resources are discovered. Chrome uses a linear list to prioritise the download order, and WebPageTest only provides a single (complete) view of the tree. If a higher priority request is discovered it is then inserted into the list by giving it the parent of the next highest priority request. HTTP/2 will then move everything else to be under it because the 'Exclusive' flag is set. Chrome is the only browser that uses this flag in this way as it forces the linear list pattern. This 'fork' is the way WebPageTest displays changes to the list over time.
The dependency graph gives you some insight into how a browser handles the downloading of page resources. It is a fantastic learning tool, especially if you want to see the different strategies each of the browsers uses.
How to view a sites HTTP/2 dependency graph (Firefox)
In the previous section about the HTTP/2 dependency graph, I focused on the Chrome browser. But I also mentioned that "Firefox builds a complex dependency tree and loads resources according to it". So lets take a look over the Firefox version of this graph and talk about what it is doing under the hood. As a Firefox user it saddens me that Firefox is now at 3.77% global usage (at the time of writing - Jan 2021), but examining another prioritisation implimentation will give you an idea of how complex this problem is, and how different vendors have choosen to tackle it.
The first thing to mention about this graph is that it is currently incomplete. There seems to be a bug in WebPageTest where it isn't capturing all the "HTTP/2 Stream" info for all of the assets. This causes the graphs to vary quite significantly between test runs. Because of this I'm just going to focus on the general language and principles of the graph, and what they all mean. Apologies for the scale of the image, I recommend clicking on it to zoom in!

First thing to mention is how diffirent it looks to the Chrome version (seen in the section above). Whereas Chrome has the 'Exclusive bit" set for each of the resources (meaning bandwidth isn't shared between streams), Firefox does something very different. Firefox places each of the resources under a group with a priority weight assigned to it. So:
- UrgentStart: Highest priority group (weight: 240). Used for downloading the HTML.
- Leader: Next highest group (weight: 200). Used for blocking CSS
- Follow: Sub-group of leader that inherits its bandwidth allocation once leader assets have finished downloading. Used for images and fonts.
- Other: This group has half the allocated bandwidth of leader (weight: 100). Used for JavaScript.
- Background & speculative: lowest priority groups (weight: 0). Once the network is idle the browse can use these for prefetches (so they don't interfere with the current page load).
The next important point to consider is about the relative weights of resources in the groups. So assets within groups will be downloaded concurrently, but an asset with a higher weight value will be allocated more bandwidth (from what the group has already been allocated). So as you can probably tell, this prioritisation model gives incredibly fine grained control of the page load. FOr more information about HTTP/2 prioritisation (including Firefox) check out these blog posts from Pat Meenan: HTTP/2 Prioritization and Better HTTP/2 Prioritization for a Faster Web.
How to view the console.log information from a test
So when a test runs via a WebPageTest it woud be useful to know what is output in the browser console. Very useful for debugging issues that may be seen in the resulting waterfall chart. There are two methods you can use.
New method: Test result screenshot So technically this isn't a new method. It used to be available in WebPageTest but was broken. Thanksfully Pat recently fixed it, so it makes this whole process much simpler. Thanks to Andy Davies for pointing this out.
On your test result page, simply navigate to the 'Screenshot` page in the secondary navigation. You will now be presented with a 'Console Log' table at the bottom that lists the Source, Level, Message, URL, and Line number for each message in the console.
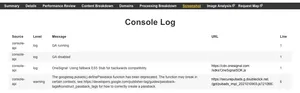
Old method: Inject script + Custom metric So I covered this method in my blog post about 'Improving perceived performance with the CSS font-display property', but I will copy it across to this page for ease too.
If you want to see what the console output is for a browser in a test. Paste the following code into the 'Inject Script' textarea:
// hijack the console.log method, allowing you to log all console massages
window._consoleMessages = [];
console.log = function(m){_consoleMessages.push(m)};

// specifically used for this font example to 'copy' the `FontFace` object
function flatten(obj) {
    var result = {};
    for(var key in obj) {
        result[key] = obj[key];
    }
    return result;
}
Then the following into the 'Custom Metrics' box under the 'Custom'. Modify as needed:
[consoleMessages]
for(var font of document.fonts){
  // push results into the hijacked console
  // could easily return a simple array though if required
  console.log(flatten(font));
}

return JSON.stringify(_consoleMessages, null, 2);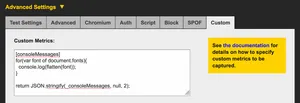
This will give you an output that looks similar to this:
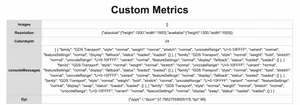
This is very useful if you are looking for specific information about a browser in a test run.
Conclusion
So there you have it, a brain dump into a blog post about some of the aspects of WebPageTest that I've found a little mysterious. As this has been a learning exercise for me too, if there is anything I have misinterpreted, please do Mastodon me and let me know!
If you would like to learn a lot more about WebPageTest, I highly recommend the book: "Using WebPageTest" by Rick Viscomi, Andy Davies, Marcel Duran.
Post changelog:
- 02/10/19: Initial post published.
- 11/10/19: Added waterfall for 'Firefox enhanced tracking protection' scenario.
- 12/10/19: Added 'service worker precaching' scenario.
- 13/10/19: Added 'Chrome Stair-Step' scenario.
- 14/10/19: Added the
dns-prefetchscenario. - 15/10/19: Added note about OCSP stapling and EV certificates (thanks Ryan Townsend for flagging).
- 16/10/19: Added information about download chunks (thanks Pat Meenan for raising and checking). Clarified the error code presentation and added a "Without OCSP" waterfall chart for comparison (thanks Andy Davies).
- 17/10/19: Added the 'HTML early flush' scenario.
- 18/10/19: Added
prefetchscenario. - 20/10/19: Added
prerenderscenario (thanks Simon Hearne & Ryan Townsend for the input). - 24/10/19: Added new section called 'Hidden Gems', including 'How the filmstrip view and waterfall chart are related', 'How to generate customised waterfall chart images', and 'How to add custom marks using the User Timing API' (Thanks again to Pat Meenan for clarification with this).
- 08/12/19: Added the Long DOM content loaded (DCL) time scenario. Originally written for my article 'Reading a WebPageTest Waterfall Chart' on the Web Performance Calendar 2019.
- 12/12/19: Added the never-ending waterfall scenario (thanks to Boris Schapira for the example).
- 20/12/19: Added a table of contents for easier navigation.
- 21/12/19: Added 'Rogue image downloads (HTTP/2 with SRI)', 'Requests with no response body' (thanks Joseph Scott), and 'Third party blocking JavaScript' (thanks Mike Herchel).
- 03/01/20: Added information about good and bad HTTP/2 prioritisation (thanks Barry Pollard and Šime Vidas for feedback), and 'How to display the bandwidth graph on mobile devices' hidden gem (Thanks Pat Meenan & Barry Pollard).
- 11/01/20: Added the 'Large Time to First Byte (TTFB)' scenario.
- 12/01/20: Added the 'Inactivity after SSL negotiation' scenario.
- 13/01/20: Added the 'Missing component times (DNS, Connect, TLS)' scenario (thanks again Pat Meenan for his input), and 'The impact of a CPU bottleneck' scenario.
- 30/01/20: Added 'Consequences of a 301 redirect when changing a URL' and 'The missing intermediate certificate' scenarios. Thanks again to Barry Pollard for the test and information about the latter.
- 22/06/20: Added information about the filmstrip borders, as layout shift is now highlighted (thanks Pat Meenan & Rick Viscomi).
- 12/08/20: Added 'How to test a 404 page' hidden gem. Added the 'Vary unusual waterfall' scenario along with a link to my blog post with a more detailed examination.
- 13/08/20: Added information 'Inline script execution' visualisation, and 'How to delve into the download chunk data' (thanks to Radu Micu & Pat Meenan for fleshing out the details).
- 05/09/20: Added 'Identifying requests not from the main page document' section.
- 22/09/20: Added 'How to view a sites HTTP/2 dependency graph' (Thanks Pat Meenan for clarification on the finer points), added 'Examining undefined 204 status codes' scenario, and 'Service Worker precache slowing a page load' (thanks Andy Davies). Update: Added tip from Jeff Posnick on how to avoid the double cache download when using Workbox.
- 03/10/20: Added explanation of the difference between 'First Byte' in the summary table, and the 'Time to First Byte' metric listed in a HTML request details panel. Thanks go to George Liu, for the question and Barry Pollard and Pat Meenan for the explanation.
- 08/11/20: Added the 'HTTP/1.1 and the
Connection: closeheader' scenario and the autofill request information. Also added the 'Identifying a Cross-Origin Resource Sharing (CORS) connection' scenario. - 11/11/20: Added 'How to examine detailed information about images on a page', 'How to inspect the 'Browser Main Thread Part 1 & 2', 'How to visualise the requests from your test', 'How to visualise variance in metrics across multiple tests' hidden gems. Added the gray colour explanation into the 'Browser Main Thread' section. Many thanks to Pat Meenan for the suggestions and fielding all the random technical questions I had!
- 16/01/21: Added an update to the 'Missing component times (DNS, Connect, TLS)' section. If you are missing connection information on Safari, read this section (Thanks Pat Meenan). Added the 'How to view the
console.loginformation from a test' hidden gem (thanks Andy Davies for pointing it out to me). - 17/01/21: Added update about the change to the JavaScript execution visualisation under the 'Updated JavaScript execution visualisation' section. Added update referencing the addition of the 'Huge' image size for the filmstrip view. Added information about the effect of 'Misconfigured CORS headers', and how it can be seen on a waterfall.
- 18/01/21: Added 'Eager prefetched' scenario. Thanks to Andy Davies for this information via this Twitter thread. Added 'How to analyse page images for optimal compression and render size' section. Thanks to Andy Davies and Barry Pollard for pointing this out to me.
- 19/01/21: Added additional details about Chromes eager prefetch and how it is due to be fixed in Chrome 88. Thanks to Andy Davies and Pat Meenan for the feedback.
- 25/01/21: Added the 'The performance impact of
@font-facesource failures' scenario. Added the 'Double font downloads when using thepreloadresource hint' scenario. Added the "SVG's opening up a new TCP connection" scenario. Added the 'How to view a sites HTTP/2 dependency graph (Firefox)' section (thanks Pat Meenan for clarification on some points). - 26/01/21: Added note that "How to inspect the ‘Browser Main Thread' - Part 1" and "How to inspect the ‘Browser Main Thread' - Part 2" only work in tests run in a Chromium-based browser (thanks Andy Davies & Pat Meenan).
- 09/02/21: Updated the timing value behind the "Page is Interactive" metric from 100ms to 50ms to match what is defined in the Long Tasks API. Thanks to Boris Schapira for raising and Pat Meenan for confirming.
- 22/03/21: Updated the 'Vertical lines' section as 'RUM First Paint' was replased with 'First Contentful Paint' and lines for CLS and LCP have been added. Thanks again to Pat Meenan for the clarifications.
- 05/01/23: Since the WebPageTest forum was shut down, links to it were broken. I've now relinked them all to the WayBackMachine. Thanks to Rockey Nebhwani for letting me know this was an issue!